Learning while making

I’ve just shipped off the first commission! I can’t say much about it yet, as it’s surprise birthday present for someone, but I’ll post a copy to my podcast shortly after their birthday arrives.

The patch for the piece I am sending off today

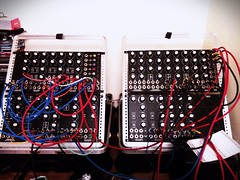
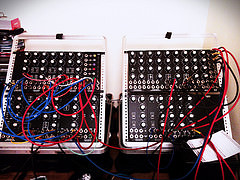
I learned a bit while making it, about how to better use a module I’ve had for a long time. Also, I think I set a personal record for most cables used in a single patch! It doesn’t look like much in the picture, but only because the black cables, are hard to see against the black synth and they outnumber the other colours. Details of what I learned and what all those cables were doing will go into the programme notes when I post the audio later.
I’m already hard at work on the next one, which I was making while updating on comet news. Probably all the sounds are recorded, so I’m just mixing it now. I thought it would be a good idea to do some more manual-sounding fades and pans, so I’m using some physical faders. The online documentation was a little bit spotty on how to get this work, so I’ll put some instructions at the bottom of this post.
Noise music commissions make great gifts, for birthdays, the holidays or just as a surprise! They are delivered not only as audio, but with a story of how it was made – including influences and even some instructions on how to recreate the sounds! This especially fun for people interested in music or sound design! If you order in November, delivery is guaranteed in time for Hanukkah or Christmas!

Using midifaders with Ardour on Linux

These instructions are for a NanoKontrol2, but will work for many other popular faders.

  1. The Ardour manual starts out very well, so follow it’s instructions to get going.
  2. Start Ardour.
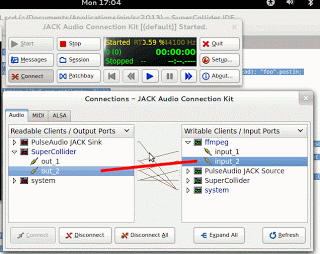
  3. Go to qjackctl and click the connect button.
  4. Expand all to find the NanoKontrol2 in the list on the left.
  5. Draw a connection between the NanoKontrol2 on the left and Ardour on the right. (You will need to make this connection every time you start Jack and Ardour.)
  6. Go to Ardour and open preferences.
  7. Go to the Control Surfaces tab.
  8. Enable ‘Generic MIDI’.
  9. Then double click generic MIDI.
  10. A window will open listing a bunch of control surfaces.
  11. NanoKontrol2 is in the list twice. The one that mentions ‘Master’ maps the 8th fader to the master faders and has seven channels for tracks. The other one uses all faders for tracks.
  12. NanoKontrol2 does not support touch, so you will be able to use this on tracks when they are set to ‘Write’ or ‘Manual’, but not when set to ‘Play or ‘Touch’.
  13. Record enable will not behave correctly unless you run the NanoKontrol2 configuration software in WINE

Do you love noise music? Do you have fashion? Drop me an email if you’d like your image to be in forthcoming posts about noise and fashion

Linux Midi on SuperCollider

This is just how I got it to work and should not be considered a definitive guide.
I started Jack via QJackCntrl and then booted the SuperCollider server.
I’ve got a drum machine connected via a MIDI cable to an m-audio fast track ultra.
This code is Making some noises:

(
var ultra;

MIDIClient.init;
"init".postln;
MIDIClient.destinations.do({|m, i|
 //m.postln;
 //m.name.postln;
 m.name.contains("Ultra").if({
  ultra = MIDIOut(i);
  ultra.connect(0);
  i .postln;
 });
});

//u = ultra;

Pbind(
 midinote, Pseq((36..53), inf),
 amp, 1,
 type, midi,
 midiout, ultra,
 chan, 1,
 foo, Pfunc({|e|"tick % %n".postf(e[chan], e[midinote])}),
 dur, 0.2
).play


)

A better script for Wacom with screen geometry changes

Why and how

This is a better script to set your stylus setting to match a changed resolution, like if you plugged in to a projector. If you are mirroring screens, the geometry may change, so that instead of using your whole 16/9 ratio screen, you’re only using a 4/3 box in the middle. The problem you may run into is that your stylus does not adjust and so where you’re pointing the stylus may differ significantly from where the pointer appears on the screen. This script fixes that.
There are some dependencies: xsetwacom xrandr, and wcalc. Make sure you have xsetwacom by typing:

which xsetwacom

If it doesn’t give you a path, you need to:

sudo apt-get install xsetwacom

Do the same for xrandr. Finally, you need wcalc, which is not installed by default. Type:

sudo apt-get install wcalc

The script is below. To save it, copy it to the clipboard starting from just below the ‘Script’ subheader and ending just above the ‘Commentary’ subheader. Then type the following in the terminal:

cd
mkdir bin
cd bin
touch stylus_script.sh
chmod +x stylus_script.sh
gedit stylus_script.sh

Don’t worry if you get an error saying bin already exists. Just carry on.

Gedit should open with a blank file. Paste the script into that file. Then save and quit. You may not need to make any changes. (See commentary.)
You’ll want to run this script when you plug into a projector (after you set the resolution you’re going to use) and then again when you unplug from it. Do this in the terminal by typing:

~/bin/stylus_script.sh

You can run these from any terminal window, at any time and it should work. If you get errors or it just doesn’t do anything, see the commentary below.

Script

#!/bin/bash


function touch_ratio {
 #get pen geometry
 LINE=`xsetwacom get "Wacom ISDv4 E6 Pen stylus" area`
 echo ${LINE}
 TabTx=`echo ${LINE} | awk '{ print $1 }'`
 TabTy=`echo ${LINE} | awk '{ print $2 }'`
 TabBx=`echo ${LINE} | awk '{ print $3 }'`
 TabBy=`echo ${LINE} | awk '{ print $4 }'`

 TouchHeight=$((${TabBy} -${TabTy}))
 TouchWidth=$((${TabBx} -${TabTx}))

 TouchRatio=`wcalc -q ${TouchWidth}/${TouchHeight}`

}


# get screen geometry
LINE=`xrandr -q | grep Screen`
WIDTH=`echo ${LINE} | awk '{ print $8 }'`
HEIGHT=`echo ${LINE} | awk '{ print $10 }' | awk -F"," '{ print $1 }'`
RATIO=`wcalc -q ${WIDTH}/${HEIGHT}`


touch_ratio

# is the touch ratio different from the screen ratio?
change=`wcalc -q abs(${TouchRatio}-${RATIO})>0.01`
wcalc -q abs(${TouchRatio}-${RATIO})
if [[ ${change} != 0 ]] 
  then

 #they differ

 # first try resetting
 xsetwacom set "Wacom ISDv4 E6 Pen stylus" ResetArea
 xsetwacom set "Wacom ISDv4 E6 Pen eraser" ResetArea 
 xsetwacom set "Wacom ISDv4 E6 Finger touch" ResetArea

 # how about now?
 touch_ratio
 
 if [[ `wcalc -q abs(${TouchRatio}-${RATIO})>0.01` != 0 ]] #they differ
   then

  if [[ ${TouchRatio} > ${RATIO} ]] # width has shrunk
    then
   # use existing height values
   TYOFFSET=${TabTy};
   BYOFFSET=${TabBy};

   # calculate new width values
   # width = ratio * height
   
   NewTabWidth=`wcalc -q -P0 ${RATIO}*${TouchHeight}`
   TabDiff=$(( (${TouchWidth} - ${NewTabWidth}) / 2));

   TXOFFSET=$((${TabTx} + ${TabDiff}));
   BXOFFSET=$((${TabBx}- ${TabDiff}));

    else # height has shrunk

   # use existing width values
   TXOFFSET=${TabTx};
   BXOFFSET=${TabBx};

   # calculate new height values
   # height = width / ratio

   NewTabHeight=`wcalc -q -P0 ${TouchWidth}/${RATIO}`
   TabDiff=`wcalc -q (${TouchHeight}-${NewTabHeight})/2`
   
   TYOFFSET=`wcalc -q ${TabTy}+${TabDiff}`
   BYOFFSET=`wcalc -q ${TabBy}-${TabDiff}`

    fi


  echo ${TXOFFSET} ${TYOFFSET} ${BXOFFSET} ${BYOFFSET}
  xsetwacom set "Wacom ISDv4 E6 Pen stylus" Area ${TXOFFSET} ${TYOFFSET} ${BXOFFSET} ${BYOFFSET}
  xsetwacom set "Wacom ISDv4 E6 Pen eraser" Area ${TXOFFSET} ${TYOFFSET} ${BXOFFSET} ${BYOFFSET}
  xsetwacom set "Wacom ISDv4 E6 Finger touch" Area ${TXOFFSET} ${TYOFFSET} ${BXOFFSET} ${BYOFFSET}

   fi
 #gnome-control-center wacom
  else
 echo normal resolution
fi

Commentary

If this script doesn’t work, it may be because the name of your wacom devices differs from mine. To find the names of your devices, type:

xsetwacom --list

You will get a list of your wacom devices. Mine looks like this:

Wacom ISDv4 E6 Pen stylus        id: 10 type: STYLUS    
Wacom ISDv4 E6 Finger touch      id: 11 type: TOUCH     
Wacom ISDv4 E6 Pen eraser        id: 15 type: ERASER    

In this script, I use the information at the far left: ‘Wacom ISDv4 E6 Pen stylus’ and the two identifiers below that. If your device list has different names, then replace the names in the script with the names of your devices. So if you have, ‘Wacom ISDv7 E13 Pen Stylus’, you would use that instead. These lines show up multiple places in the script, so if you need to change it, make sure you get it every time, down to the bottom of the file.

How it works

This script gets the geometry of your screen and the geometry of your stylus and calculates the width/height ratio for each. If this differs by more than a fractional amount, it calculates a new width or height for your stylus.

Script to modify wacom tablet settings to reflect a changed screen geometry

Update

This script has now been replaced with a better version: http://www.celesteh.com/blog/2013/05/26/a-better-script-for-wacom-with-screen/. You will want to use the newer script instead.

Why you would need this and how to use it

Ok, let’s say you have a tablet computer and you want to mirror your display to a projector and you want to use your stylus. Your screen geometry may change, so that instead of using your whole 16/9 ratio screen, you’re only using a 4/3 box in the middle. The problem you may run into is that your stylus does not adjust and so where you’re pointing the stylus may differ significantly from where the pointer appears on the screen. This script fixes that.
There are some dependencies. Make sure you have xsetwacom by typing:

which xsetwacom

If it doesn’t give you a path, you need to: sudo apt-get install xsetwacom
and you need wcalc, which is not installed by default. Type:

sudo apt-get install wcalc

The script is below. To save it, copy it to the clipboard starting from just below the ‘Script’ subheader and ending just above the ‘Commentary’ subheader. Then type the following in the terminal:

cd
mkdir bin
cd bin
touch stylus_script.sh
chmod +x stylus_script.sh
gedit stylus_script.sh

Don’t worry if you get an error saying bin already exists. Just carry on.
Gedit should open with a blank file. Paste the script into that file. Before you save and quit, you will need to make a small change to the top of the script with your own default screen geometry. To find this out, unplug all projectors, etc and open your system settings and look at displays. Set your display to however it is normally. The resolution should have two numbers. In my case they are 1366 x 768. The first is the width and the second is the height. Therefore, at the top of my script, I have:

# change these lines to match your normal screen geometry (note: we assume this normally takes up your whole screen)
NormalWidth=1366
NormalHeight=768

If your display is 1280 x 720, then you would change that to:

NormalWidth=1280
NormalHeight=720

Once you have the correct values in there, save it and you don’t need to change it again. You only have to do all of the above just the one time.
You’ll want to run this script when you plug into a projector (after you set the resolution you’re going to use) and then again when you unplug from it. Do this in the terminal by typing:

source stylus_script.sh

Do it in the same terminal both times.(Further optional commentary about that and other issues is at the bottom of the post.) When you run it the second time, after unplugging the projector, it should put your stylus settings back to normal. Your settings should also reset to normal if you log out and log back in again. If you can’t run this twice from the same terminal, or if that doesn’t work, then you will need to log out and back in.

Script

#!/bin/bash

# check the screen geometry

# change these lines to match your normal screen geometry (note: we assume this normally takes up your whole screen)
NormalWidth=1366
NormalHeight=768

# the script


NormalRatio=`wcalc -q ${NormalWidth}/${NormalHeight}`

LINE=`xrandr -q | grep Screen`
WIDTH=`echo ${LINE} | awk '{ print $8 }'`
HEIGHT=`echo ${LINE} | awk '{ print $10 }' | awk -F"," '{ print $1 }'`
RATIO=`wcalc -q ${WIDTH}/${HEIGHT}`


if  [[ ${NormalRatio} != ${RATIO} ]] # screen is not in normal configuration
  then
 if [[ (! $ALREADYRECALIBRATED ) || ($ALREADYRECALIBRATED == 0)]] # we haven't already adjusted
   then
  LINE=`xsetwacom get "Wacom ISDv4 E6 Pen stylus" area`

  export TabTx=`echo ${LINE} | awk '{ print $1 }'`
  export TabTy=`echo ${LINE} | awk '{ print $2 }'`
  export TabBx=`echo ${LINE} | awk '{ print $3 }'`
  export TabBy=`echo ${LINE} | awk '{ print $4 }'`

  OldTabHeight=$((${TabBy} -${TabTy}))
  OldTabWidth=$((${TabBx} -${TabTx}))

  if [[ ${NormalRatio} > ${RATIO} ]] # width has shrunk
    then
   # use old height values
   TYOFFSET=${TabTy};
   BYOFFSET=${TabBy};

   # calculate new width values
   # width = ratio * height
   
   NewTabWidth=`wcalc -q -P0 ${RATIO}*${OldTabHeight}`
   TabDiff=$(( (${OldTabWidth} - ${NewTabWidth}) / 2));

   TXOFFSET=$((${TabTx} + ${TabDiff}));
   BXOFFSET=$((${TabBx}- ${TabDiff}));

    else # height has shrunk

   # use old width values
   TXOFFSET=${TabTx};
   BXOFFSET=${TabBx};

   # calculate new height values
   # height = width / ratio

   NewTabHeight=`walc -q -P0 ${OldTabWidth}/${RATIO}`
   TabDiff= $(( (${OldTabHeight} - ${NewTabHeight}) / 2));
   
   TYOFFSET=$((${TabTy} + ${TabDiff}));
   BYOFFSET=$((${TabBy}- ${TabDiff}));

    fi
  #echo ${TXOFFSET} ${TYOFFSET} ${BXOFFSET} ${BYOFFSET}
  xsetwacom set "Wacom ISDv4 E6 Pen stylus" Area ${TXOFFSET} ${TYOFFSET} ${BXOFFSET} ${BYOFFSET}
  xsetwacom set "Wacom ISDv4 E6 Pen eraser" Area ${TXOFFSET} ${TYOFFSET} ${BXOFFSET} ${BYOFFSET}
  xsetwacom set "Wacom ISDv4 E6 Finger touch" Area ${TXOFFSET} ${TYOFFSET} ${BXOFFSET} ${BYOFFSET}

  export ALREADYRECALIBRATED=1
   fi
 #gnome-control-center wacom
  else
 echo normal resolution
 # check if we've done some past calibration
 if [[ $ALREADYRECALIBRATED  && $ALREADYRECALIBRATED == 1 ]]
   then
  xsetwacom set "Wacom ISDv4 E6 Pen stylus" Area $TabTx $TabTy $TabBx $TabBy
  echo previous calibration restored
  export ALREADYRECALIBRATED=0
   fi
fi

Commentary

If you chose to run this some other way than typing ‘source stylus_script.sh’ in the terminal when plugging in a projector and then running it the same way again in the same terminal when unplugging the projector, it will not be able to restore your normal settings. You can try running the calibration tool to fix your settings or else log out and log back in again. The reason it needs to be run twice from the same terminal is because it stores your default settings in environment variables. There are undoubtedly better ways of doing this, so please leave a comment if you’ve got code that does it better.
If you normally run your screen display in a different ratio than the physical device, I’m not 100% the maths for this script will be correct for you. Let me know in the comments if you need help in this case.
The tablet height as seen by the wacom device is very different than the height in pixels. This makes sense because pixel size can change dramatically but the physical size of screen in use will stay the same. I assume that any change in display size will be letter-boxed either on the top and bottom or on the sides, but will always be centred and will never have blank space on both the sides and the top and bottom at the same time. If you don’t follow these assumptions, this script will require some modifications to work for you.

A useful script

The best way to remember to do something when you’re going to run some important program is to put in the program itself. Or at the very least, put it in a script that you use to invoke the program.
I have a few things I need to remember for the performance I’m preparing for. One has to do with a projector. I’m using a stylus to draw cloud shapes on my screen. And one way I can do this is to mirror my screen to a projector so the audience can see my GUI. However, doing this usually changes the geometry of my laptop screen, so that instead of extending all the way to the edges, there are empty black bars on either side of the used portion of my display. That’s fine, except the stylus doesn’t know and doesn’t adjust. So to reach the far right edge of the drawn portion of the screen, I need to touch the far right edge of the drawn portion, which puts over a centimetre between the stylus tip and the arrow pointer. Suboptimal!
Ideally, I’d like to have any change in screen geometry trigger a script that changes the settings for for the stylus (and I have ideas about how that may or may not work, using upstart, xrandr and xsetwacom), but in the absence of that, I just want to launch a manual calibration program. If I launch the settings panel, there’s a button on that that launches one. So the top part of my script checks if the calibration is different than normal and launches settings if it is.
The next things I need to remember are audio related. I need to kill pulseaudio. If my soundcard (a Fast Track Ultra) is attached, I need to change the amplitude settings internally so it doesn’t send the input straight to the output. Then I need to start jack using it. Or if it’s not attached, I need to start jack using a default device. Then, because it’s useful, I should start up Jack Control, so I can do some routing, should I need it. (Note: in 12.04 if you start qjackctl after starting jackd, it doesn’t work properly. This is fixed by 13.04.) Finally, I should see if SuperCollider is already running and if not, I should start it.
That’s a bit too much to remember for a performance, so I wrote a script. The one thing I need to remember with this script is that if I want to kill jack, it won’t die from Jack Control, so I’ll need to do a kill -9 from the prompt. hopefully, this will not be an issue on stage.
This is my script:

#!/bin/bash


# first check the screen

LINE=`xrandr -q | grep Screen`
WIDTH=`echo ${LINE} | awk '{ print $8 }'`
HEIGHT=`echo ${LINE} | awk '{ print $10 }' | awk -F"," '{ print $1 }'`

if  [[ ${WIDTH} != 1366 || ${HEIGHT} != 768 ]]
  then
 gnome-control-center wacom
  else
 echo normal resolution
fi


# now setup the audio

pulseaudio --kill

# is the ultra attached?
if aplay -l | grep -qi ultra
  then
 echo ultra
 
 #adjust amplitude
 i=0
 j=0
 for i in $(seq 8); do
         for j in $(seq 8); do
                 if [ "$i" != "$j" ]; then
                         amixer -c Ultra set "DIn$i - Out$j" 0% > /dev/null
                 else
                         amixer -c Ultra set "DIn$i - Out$j" 100% > /dev/null
                 fi
                 amixer -c Ultra set "AIn$i - Out$j" 0% > /dev/null
         done
 done

 #for i in $(seq 4); do 
 # amixer -c Ultra set "Effects return $i" 0% > /dev/null 
 #done 

 #start jack
 jackd -d alsa -d hw:Ultra &
  else
 #start jack with default hardware
 jackd -d alsa -d hw:0 &
fi

sleep 2

# jack control
qjackctl &

sleep 1

# is supercollider running?
if ps aux | grep -vi grep | grep -q scide
  then
 echo already running
  else
 scide test.scd &
fi

Compiling SuperCollider on Ubuntu Studio 3.04 beta 2 (and otherwise setting up audio stuff)

The list of required libraries has changed somewhat from different versions. This is what I did:

sudo apt-get install git cmake libsndfile1-dev libfftw3-dev  build-essential  libqt4-dev libqtwebkit-dev libasound2-dev libavahi-client-dev libicu-dev libreadline6-dev libxt-dev pkg-config subversion libcwiid1 libjack-jackd2-dev emacs gnome-alsamixer  libbluetooth-dev libcwiid-dev netatalk

git clone --recursive https://github.com/supercollider/supercollider.git

cd supercollider

mkdir build

cd build

cmake ..

make

If all that worked, then you should install it:

sudo make install

scide

If it starts, you’re all good!
Users may note that this version of Ubuntu Studio can compile in Supernova support, so that’s very exciting.
I’ve gone to a beta version of Ubuntu Studio because Jack was giving me a bit of trouble on my previous install, so we’ll see if this sorts it out.
Note in the apt-get part that emacs is extremely optional and netatalk allows me to mount apple mac file systems that are shared via apple talks, something I need to do with my laptop ensemble, but which not everyone will need. Gone-alsamixer is also optional and is a gnome app. It’s a gui mixer application which lets you set levels on your sound card. Mine was sending the ins straight to the outs, which is not what I wanted, so I could fix it this way or by writing and running a script. Being lazy, I thought the GUI would be a bit easier. There’s also a command line terminal application called alsamixer, if you like that retro 80’s computing feeling.
It can also be handy to sometimes kill pulse audio without it respawning over and over. Fortunately, it’s possible to do this:

sudo gedit /etc/pulse/client.conf

Add in these two lines:

autospawn = no
daemon-binary = /bin/true

I still want pulse to start by default when I login, though, so I’ve set it to start automatically. I found the application called Startup Applications and clicked add. For the name, I put pulseaudio. for the command, I put:

pulseaudio --start

Then I clicked the add button on that dialog screen and it’s added. When I want to kill pulseaudio, I will open a terminal and type:

pulseaudio --kill

and when I want it back again, I’ll type:

pulseaudio --start

(I have not yet had a killing and a restarting throw any of my applications into silent confusion, but I’m sure it will happen at some point.)
There’s more on this

Recording Audio and Video from SuperCollider on Ubuntu Studio

Recently, I needed to record my screen and audio while SuperCollidering on Ubuntu Studio. (This will work on other operating systems also also with some tweaks.) This is the code I included:

s.waitForBoot({

("ffmpeg -f jack -ac 2 -i ffmpeg -f x11grab -r 30 -s $(xwininfo -root | grep 'geometry' | awk '{print $2;}') -i :0.0 -acodec pcm_s16le -vcodec libx264 -vpre lossless_ultrafast -threads 0" +
    "/home/celesteh/Documents/" ++ Date.getDate.bootSeconds ++ ".mkv"
        ).runInTerminal;

....

})

As far as I am able to determine, that allows you to record stereo audio from jack and the screen content of your primary screen. Obviously the syntax is slightly dense.

I was unable to figure out how to tell it to automatically get the jack output I wanted, so in order to run this, I first started JACK Control, used that to start jack, and then evaluated my SC code, which included the above line. That opened a terminal window.

Then I went back to JACK Control and clicked the Connect button to open a window with a list of connections. I took the supercollider output connections and dragged them to the ffmpeg input connections, which enabled the sound. This step is very important, as otherwise the recording will be silent. The dragging is illustrated in the accompanying image by the thick, red line.

Then AFTER making the audio connection, I started making sound with SuperCollider, which was then recorded. When I finished, I went to the terminal window opened by supercollider and typed control-c to stop the recording. Then, I quit the SC server and JACK.

After a few moments, the ffmpeg process finished quitting. I could then watch the video and hear sound via VLC (on my system, VLC does not play audio if jack is running, so check that if your film is silent). I used OpenShot to cut off the beginning part, which included a recording of me doing the jack connections.

The recommended way of recording desktop output on ubuntu studio is recordmydesktop, but there are many advantages to doing it with ffmpeg instead. There is a bug in recordmydesktop which means it won’t accept jack input, so you have to record the video and audio separately and splice them together. (If you chose to do this, note you need to quit jack before recordmydesktop will generate your output file). Also, I found that recordmydesktop took up a lot of processing power and the recording was too glitchy to actually use. The command line for it is a LOT easier, though, so pick your preference.

You need not include the command to start ffmpeg in your SuperCollider code. Instead of using the runInTerminal message, you can just run it in a terminal. As above, make sure you start JACK before you start this code and don’t forget to make the connections between it and ffmpeg. I prefer to put it in the code because then I don’t forget to run it, but this is a matter entirely for personal preference.

Cross-platform

Almost all of the programs linked above are cross-platform, so this is very likely to work on mac or windows with only a few changes. Mac users have two ways to proceed. One is to use jack with QuickTime. You can use jack to route audio on your system so the SuperCollider output goes to the quicktime input. Or, if you’re in windows or just want to use ffmpeg, you will need to change the command line so that it gets the screen geometry in a different way and so that it captures from a different device. Check the man pages for ffmpeg and for avconv, which comes with it. Users on the channel on freenode can also help. Leave a comment if you’ve figured it out.

Compiling superCollider on Ubuntu studio 12.0.4

For various annoying reasons, I’ve just reformatted my hard drive and freshly installed the latest Ubuntu Studio LTS. As soon as I’d restored my home directory, I set to work compiling SuperCollider.
The README_Linux.txt file covers most of what you need to know, but here’s what I had to type to get going:

sudo apt-get install git cmake libsndfile1-dev libfftw3-dev  build-essential  libqt4-dev libqtwebkit-dev libasound2-dev libavahi-client-dev libicu-dev libreadline6-dev libxt-dev pkg-config subversion libcwiid1 libjack-jackd2-dev emacs

cd ~/Documents

git clone --recursive https://github.com/supercollider/supercollider.git

cd supercollider

mkdir build

cd build

cmake .. -DSUPERNOVA=OFF

make

You have to disable supernova because it requires a newer version of gcc. If all that works, then you can install it:

sudo make install

I had something go wrong with my installed SC libs, but that’s a side issue.

How I got Second Life on Linux

When I tried to run Second Life’s beta release on linux, from the command line, I got the following error:

64-bit Linux detected.
Running from /home/celesteh/.secondlife-install
 - Installing menu entries in /home/celesteh/.local/share/applications
bin/do-not-directly-run-secondlife-bin: error while loading shared libraries: libGL.so.1: cannot open shared object file: No such file or directory
*** Bad shutdown ($LL_RUN_ERR). ***

You are running the Second Life Viewer on a x86_64 platform.  The
most common problems when launching the Viewer (particularly
'bin/do-not-directly-run-secondlife-bin: not found' and 'error while
loading shared libraries') may be solved by installing your Linux
distribution's 32-bit compatibility packages.
For example, on Ubuntu and other Debian-based Linuxes you might run:
$ sudo apt-get install ia32-libs ia32-libs-gtk ia32-libs-kde ia32-libs-sdl

*******************************************************
This is a BETA release of the Second Life linux client.
Thank you for testing!
Please see README-linux.txt before reporting problems.

I checked if I had libGL.so.1 installed. I did:

$ sudo find / -name libGL.so.1
[sudo] password for celesteh: 
/usr/lib32/mesa/libGL.so.1
/usr/lib/x86_64-linux-gnu/mesa/libGL.so.1

I went to the directory where Second Life installs itself (the install.sh script tells you where this is when you run it. And I edited the script called SecondLife. I changed this line:

export LD_LIBRARY_PATH="$PWD/lib:${LD_LIBRARY_PATH}"

To this:

export LD_LIBRARY_PATH="$PWD/lib:/usr/lib32/mesa:${LD_LIBRARY_PATH}"

Note that /usr/lib32/mesa is one of the results I got from running find. It’s the one that seems to be 32 bit.
After I fixed that, it opened (and popped a warning saying my computer is underpowered, which I assume is another library issue. I have NO IDEA what to do about this. Will update if and when I figure it out.
I know what you’re thinking. and the answer is that the network is the computer. And the live coding is the music. and SecondLiveCoding is the future.

Planned Obsolescence

Ok, Apple Computer makes great products that are plug and play. Provided that everything is all the same age. For example, if you have one of the first generation Apple-branded flat screen monitors, you cannot plug it into a Mac mini. The pin assignment and whatnot of the plug have not changed. But the size of the plug has changed. The Apple stores don’t sell adaptors.

Maybe Apple resellers sell an adaptor, but that’s hard to know since apple intentionally bankrupted most of them. It’s worth noting here, as an aside, that the VGA plug has not changed since it was introduced. While your 1999 Apple monitor is “too old,” you 1985 VGA monitor will still work fine with any VGA-equipped computer.
It’s time to stop pretending that Apple is somehow the high road. They do every Microsoft-like trick they can get away with. The only reason their products are better is because they’re trying to catch up in market share. If they achieved the position of dominance that Microsoft has, they would start selling crap products too.
For desktop computers, I’m switching to linux from now on. I have to build half the tools that I use anyway. It would only be slightly more work to build the whole system and at least then I would have the latest version of everything instead of waiting for the fink port.

Edit

Ok, the reason the plug changed is because Apple decided to switch from their own standard to an industry standard, which is an idea that I support. However, it’s still true that their own stores don’t carry the $100 adaptors and that all the best resellers are dead. And that their so-called geniuses don’t tell you jack about what’s up with changing plug sizes. Also, if you want to add RAM to a Mac mini, you’re going to be shelling out for an hour of labor. Ouch. Order it with the ram, don’t plan to upgrade.