Collaborative Live Coding via Jitsi Meet for Linux Users

Jitsi Meet works best in Chromium, so these instructions are for that browser. It also assumes that your live coding language uses Jack Audio.

Jack and Pulse

The first thing you need to do is to get Pulse Audio and Jack Audio running at the same time and talking to each other. For me, I was able to solve this in Qjackctl. In settings, under the option tab, go to Execute Script after startup. Paste in “pactl load-module module-jack-sink channels=2; pactl load-module module-jack-source channels=2; pacmd set-default-sink jack_out” without the quotes.

You can test if both are running at once by starting jack and then playing audio from a normal system program like your web browser. If you hear sounds, it worked.

More information about getting both running is here.

Jack Audio – Pulse Sink

Make Connections

You get two sinks. One of them is going to be used to send audio into Jitsi and the other will be used to get audio out.

Jack with two Pulse sinks and the system in/out

Start your live coding language audio server. (Ie Boot SuperCollider). Go back to Qjackctl. Click on connections. Go to the Audio tab. Make a connection from your live coding language output to Pulse Audio Jack Source-01 input. Do this by clicking on the language in the left column and the Source-01 in the right column so both are highlighted. Then click the “Connect” button on the lower left.

Disconnect the the system output from that Source’s input if you want to turn off your microphone. Do this by clicking on the system in the left column and Source-01 in the right column and clicking the “Disconnect” button.

Everything connected correctly

Chromium Settings

(These will also work for Chrome.)

First open your Jitsi Meet connection. If you are using the server at Meet.jit.si, you can skip this step.

For most other Jitsi servers, in Chromium, go to chrome://settings/content/microphone Change the mic input to Pulse Audio Jack Source-01.

Chromium Settings

Jitsi Settings

As we’re live coding, you’ll want to share your screens. Mouse over the screen so you can see the icons at the bottom appear. The one in the lower left corner looks like a screen. Click on it.

The farthest left is the screen

It lets you pick a video source. If you’re on Wayland, like most linux users have been for years now, you can share your entire screen, but you should be able to share a single window. If you don’t see your live coding language listed as a window, make sure Chromium and it are on the same virtual desktop.

Share Your Screen

Click the screen icon again to switch back to your webcam.

Fancy New Options

If you’re on a shiny new version of jitsi, such as the one at Meet.jit.si, You’ll see little carrots by the mic and video icons in the centre bottom of your browser window.

New Features!!

These allow you to pick your audio source without having to go into Chrom/ium settings. If you have more than one webcam, you can also pick which one you want to use there, without having to go into Chrom/ium settings for that either.

Be Careful of Levels!

Jitsi was made assuming that more or less one person would be talking at a time, so multiple streams at full volume can distort. Make sure to leave your output low enough to leave room for your collaborators. Your system volume controls will not work, so be sure to set the levels in your live coding language IDE.

Also be aware that while the compression sounds good for free improvisation on acoustic instruments, the transformations on digital audio will seem more pronounced. Go with it. This is your aesthetic now.

How to give a speech at a protest, demonstration or rally

The recent London Met police watchlist specifically was worried about the radicalising power of emotive speech. This is because emotive speech works. You can list facts and figures in your speech, and you should, but people act based on how they feel. Conveying a sense of urgency, outrage and hope, simultaneously is the heady mix to build a movement and actually create change, no matter the issue.

Being outside is inherently distracting and you need to keep energy high, so keep the speech short. 3-5 minutes is ideal. You also want to make sure to keep people engaged, so starting with some chanting or call and response is a great way to give people some initial energy. The chants you use at this point should work to build group identity. They can use the name of the organisation (“When I say ‘extinction’, you say ‘rebellion!’”) or be about the general cause that has brought everyone out.

Then you want to state the problem or issue that is the main topic of your speech. Start by setting a scene, go more into details about what the issue is, save the most outrageous parts for last. You want it to start in everyday, accessible language. Keep the emotional level rising throughout the speech. It’s fine to engage the audience between sections. (“Are we going to stand for this??”)

The second major part of your speech, shorter than the first, is making demands. Gradually raise the stakes. It’s fine to make some demands of the crowd, but you need to know the audience and quit while you’re ahead. If you ask a bunch of middle class white climate activists to go vegan, this might be the push that some of them need. If you tell people to quit their jobs and become full time activists, you’ve likely gone too far and undone some of your previous good work.

The largest demands needs to be against the target of the protest or of the state. Again, these need to gradually up the stakes. Start with something everyone aggress with and push so that it’s still entirely reasonable but would require major system change to implement.

For example, “Britain must outlaw the importation and sale of the products of slave labour” is a good starting point. This is an obviously good idea. But carry on with, “British companies must not profit off of slave labour anywhere in the world.” Also extremely reasonable, but much harder to implement. This is what you want. Carry on, “All proceeds any British company, subsidiary, or owner, must have any proceeds of forced labour confiscated. This money must be paid out in restitution to individuals and communities effected by this disgusting practice!” That’s a transitional demand. Because we want to outlaw slavery globally. Apple products made by slave labour shouldn’t be on sale in our shops, but nor should they be on sale anywhere. That this would be hard to implement is good – it shows that the entire system must be overhauled to respect human rights.

Some groups feel that making capitalism a direct and named target is pushing things too far and will lose audiences. I increasingly disagree with this, but use your judgement.

Then make sure to give hope. If you were talking about slavery, you could talk briefly about how Britain sent out it’s navies to free slaves in transport. (True!) Or you can be more generic (“We can change and we will change! We will fight and we will win!”).

End with chanting that is more specifically tied to what you spoke about. (“Climate justice / human rights. One struggle / one fight”)

Performance Practice

Your speech is a performance. Do things you would do to prepare for a performance. You may need to practice speaking into a PA or practice the whole speech. You’ve written something that sitrs emotions, so deliver it with those emotions – be passionate! Stand up straight. Look determined. Take a deep breath. You can do it.

How to talk into a PA

If you are using a bullhorn, hold the microphone close to your mouth. Speak slowly and clearly. If you are using a system with a more normal microphone, hold it part way down. Do not grab it by the business end and especially don’t cover any grill or openings with your hands. Point it at your mouth. As with a bullhorn, speak slowly and clearly. If you get feedback, move behind the speaker and make sure the mic is only pointing at you – not any speakers.

How to hold a microphone
Holding a microphone

Getting Started with SPEAR

Sinusoidal Partial Editing Analysis and Resynthesis is a zero-cost program for Macs and Windows. It works with the latest Macintosh system update.

It is a program that does FFTs of audio files to display a spectrum which you can then edit. It’s not as fully-featured as AudioSculpt, but it’s compatible with your new Mac and the price is right.

When you open a file, it starts by asking you a few questions.

Sinusoidal Partials Analysis window

One of the things it asks is the bin spacing for the FFT. This should be narrower for low pitched sounds and can be wider for higher sounds. If you have a stereo file, it asks which channel you want to process. It works best with mono, so if you have a stereo file, you may wish to mix it down to mono or to process the left and right separately.

Constituent frequencies of a given sound, if they’re loud enough to be important, are called partials. All of the lines in the big window represent partials. Ones towards the bottom are lower in pitch and ones above are higher. Time moves from left to right. The darker partials are louder.

If you want to hear the sound, press space bar. If you don’t hear anything check the preferences and make sure audio is going to to correct output.

The preferences window showing the audio pane, with Core Audio Built-in Output selected.

The transform menu contains a several things you can do to the sound. If no partials are selected, these will apply to every partial. Otherwise, they apply to only the ones which are selected.

The Transform menu

To select a single partial, pick the arrow in the tools menu, and then click on the partial. To select a rectangular area, pick the plus sign, to select a free area, pick the lasso. You can shift click or shift select to grow a selection area. Also see the edit menu for options like inverting your selection.

The tools window

When you hover over an item in the tools menu, the name of the item appears. These items include time stretching, moving, shifting, transposing and drawing in new partials. You can use the time stretch tool to just stretch selected partials in one part of the file.

You can save files, which are the analysis files that SPEAR has created and which you’ve modified. You can also save a rendering as an audio file. There are a few choices with this. You can do an additive re-synthesis using a bunch of sine waves or an IFFT. If unsure, experiment to see what sounds best with the particular file you’re editing.

The Sound menu

There is no manual for SPEAR, but there is a single webpage with some explanations. Or there are some technical papers you can fine on the program’s website.

This program has been written with GTK portability in mind, but I could not find a link to source code and no linux binaries seem to be available. I have written to the author to ask if he intends to make this a FLOSS project, as it seems like a really good fit for the Ubuntu Studio distribution. I’ll update if I hear back. Sending an email like this, is, of course, asking a favour, so I’m a bit worried that he might get this question a lot. In any case, releasing a mac compatibility update was definitely a public good.

The Dead Shopping Mall Project

For various regions, shopping malls across America (and in other places) are dying. Many have only a few shops left in them. A few, somehow, manage to thrive.

Many Gen-Xers spend their formative years in shopping malls, walking endlessly in circles. The experience of these malls was not only a visual panorama of their shiny flat surfaces, but also very much their acoustics. The indoor stores separated themselves from the indoor mall by using piped in music, which informed shoppers that they were entering a different space. The music used was chosen to signal what demographic the store hoped to attract. Stores for teens played the top 40 that appealed to that age group.

Department stores and the mall itself played more neutral music, trying to signal a more broad appeal. All of this was set in space full of talking, foot traffic, and young people, set against very reflective surfaces. It was not just the music chosen, but the acoustic that differentiated spaces.

Smaller stores had nearby walls, dampened with hanging clothes or other wares, and thus their reflections were different than the more open mall.

As malls disappear, their unique sonic environment disappears also. It’s impossible to recapture what they were like when filled with people, unless you somehow entice people to come in. But the echoes of the sonic space and the dimensions of the architecture can be archived in a form that’s usable for people who would like to experience what being in such a place sounded like.

This usable archive can be made via a short audio file called an Impulse Response. It is a recording of the echoes of the space. Below, you can find instructions on one way to make such a recording.

These recordings should be made, as a form of acoustic ecology and of memory. So the sounds can still be used even as the spaces themselves vanish.

How to take an impulse response with two mobile phones.

  1. You will need software for your computer: audacity and fscape
  2. You will need to decide which of the phones has the better microphone. Put a good-quality audio recorder on it. This is your recorder-phone.
  3. Put this audio file on to the other phone. This is your player-phone.
  4. Before you head to the mall (or whenever you switch phones), take a calibration recording.
    1. Play the file from the player-phone while recording it with the recorder-phone. Hold the recorder-phone so it’s microphone is as close as possible to the player-phone’s speaker.
    2. Always record at the best possible settings. Try to use a non-compressed file format like WAV or AIFF.
    3. Make a note of which file is your calibration recording.
  5. Go to the mall and pick out what spaces you would like to take an IR in, then take them.
    1. Decide how far away you want the two phones to be from each other. If the phones are further apart, you get more of the sound of the space. If they’re closer together, the IR will be more intimate. If the spaces is noisy, it might be hard to record at further distances. (If you’re unsure or want options, you can do recordings at multiple distances.)
    2. Play the sound from the player-phone while you are recording with the recorder-phone. Always record at the best possible settings and try to use an uncompressed file format like WAV or AIFF.
    3. Make a note of what mall that you’re at (ie ‘Valley Fair, San Jose, California’), where in the mall you are (ie ‘food court’) and an estimate of the distance (ie ‘2 meters’). Make a note of which recording you’re referring to (either by writing it down or editing the file name).
  6. When you get home, transfer all the recordings to your computer. If you have not already given them descriptive names (ie: ‘ValleyFairFoodCourt2mRec.wav’), do so now.
  7. Open your calibration recording in Audacity, normalise it and reverse it. (These options can be found under the effects menu). Then export it as ‘callibration-rev.wav’. (Export is under the file menu)
  8. Repeat the following process with all of the mall recordings you made:
    1. Open the recording in Audacity, and normalise it. Export it with a descriptive name (ie ‘ValleyFairFoodCourt2mNrml.wav’)
    2. Open Fscape. Under the menu ‘New Module’, select ‘Spectral Domain’ > ‘Convolution’
    3. For the input file, select the mall recording
    4. For the ‘Impulse Response’, put the reversed calibration file, callibration-rev.wav.
    5. Give the output file a descriptive filename (‘ValleyFairFoodCourt2mConv.wav’)
    6. Select Render
    7. Open the output file in Audacity. In the middle of the file, there will be a loud part. Use your mouse to select just the loud part (zoom in to get it as tight as you can. If there’s a bit of lead in and a bit of fade-out, get that too).
    8. Hit the ‘z’ key to slightly adjust your selection
    9. Under the file menu, select ‘Export Selection’. This is the finished impulse response! Give it a descriptive file name (‘ValleyFairFoodCourt2mIR.wav’)
    10. You can erase your source files when you’re done if you want. Be sure not the erase the reversed calibration file until you’ve created all the finished IRs
  9. Now that you’ve got the IRs, please send them to me! Or, better, post them to archive.org and send me the links.
  10. You can use them on recorded audio to make it sound as if it took place in the mall! If you have reverb software, you can use the IR you just made as the IR, or you can use Fscape. Do a convolution with your source file, using the IR you made as the Impulse Response. The output will have the sonic characteristics of the mall!

Moving to Diaspora*

For many reasons, I’ve decided to drastically curtail my involvement with Facebook and move my social networking efforts towards Diaspora. If this name sounds vaguely familiar, it’s because they were briefly famous a few years ago when they launched the site before it was ready. However, despite a troubled start, developers have kept working on it and it has gotten to be pretty good. This post explains a bit about disapora and turns into a short tutorial.

Decentralisation

Diaspora is not one site but many. If you think about email: I use email through my university, my wife uses hotmail, many of my friends use gmail. We have different providers, but we can all email each other. And if next week, google decides to close gmail or do something awful with it, everyone on gmail can migrate to another mail server and still send and receive emails. Because there’s a standard for how email works, we have lots of choices about where we get our email. This is somewhat annoying, but also good – we’re not tied to any particular company and if our host gets annoying we can leave.
Diaspora is somewhat like that. Every email user has some email server/provider. Every Diaspora user has a pod. It’s decentralised, like email. However, all the pods look almost identical when you log in, so there’s only one user interface to learn.

Picking a pod

I’ve just signed up for a handful of pods and have recommendations! People in North America or who are into the arts should join shreckislove. (Loving Shreck is optional.) People in the EU should join Despora.de.
If you want to do your own research or try out a few pods on your own, there is a resource podupti.me, which gives statistics about various pods.
You can join as many pods as you would like or have as many identities as you would like. Make an account for yourself and one for your drag persona and one for your band.

Signing Up

Those links above take you straight to the sign up pages for the pods. That should be pretty straight forward. For the username, you need to pick something like you might pick for your email address or twitter @username. Remember your username, because you’ll use it to log back in later.

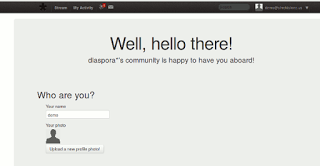
Signing up will take you to a welcome screen. Ignore the part that asks for your name and click on the button that says, ‘Upload a new profile photo!’. It will pop up a window to pick an image from your hard drive. Pick one you like. A little yellow banner will appear at the top of the screen saying ‘OMG you look awesome’ and the user icon will update to your image. When this is done, scroll down. There’s a box that asks for hastags. Type in a few words that you’re interested in, starting them with #. So if you like puppies, type #puppies. This will not effect your profile right now, because of a bug, but will effect what public posts you see in your stream. After you type as many or as few topics you want to see posts on, click the button that says ‘Awesome! Take me to Diaspora.’ If you decide to skip putting in any hastags, it will ask you if you’re sure. Click ok.
When you first log in, they give you some help text and your screen looks something like this next image.

Edit your Profile

As nice as that is, let’s start by modifying our profile. In the upper right hand corner, you’ll notice your username@your_pod. Click on that and you’ll get a little menu. Click on profile. Then, on the next screen, click on the button that says ‘edit my profile’.
Everything on your profile is optional. Give as much or as little information as you want.
The top part is your public profile. This is stuff that is visible to random people. Fill in what first and last name you want to use in the name boxes.
For the box that says ‘describe yourself in 5 words, it wants hashtags. If you like puppies, zimba, bicycling, pizza, and anarchism, you would type all of those words starting with #. It will try to do some auto-fill magic for you and a menu will pop up as you type. If you see what you want to type, you can click on it, or else just keep tying your word until its all typed and the hit space. Your word, #puppies, will have a blue box around it. You can put as many or as few hashtags as you want for your interests.
Below that is your private profile. This will only be viewable to people you add as contacts. You can type whatever you want for your bio, your location, and your gender. (Mine is set to ‘manly’. It’s completely open.) Then is your birthday, which you can fill in or not. Below that, you can select if you want to let people search for you. And then below that, you can set your profile as NSFW, is you plan to have a lot of content that might perplex people’s prudish line managers.
Click ‘update profile’. This will take you back to the first screen you saw after making your account. The one that says ‘Well, Hello there.’ At the top left of that screen, you’ll see some words on the top bar. One of them says ‘stream.’ Click on that.

Add a contact

We’re now back at the stream page. At the top right, you’ll see a search box. Click on that and type: celesteh@joindiaspora.com . A drop down menu will appear. Type in the whole term and then wait a moment. Hit enter. You will see my profile.

Near the top, to the right of my name, you’ll see a pull down menu that says, ‘Add contact’. When you click on that, you’ll get a list of ‘aspects.’ The default opens are friends, family, work, or acquaintances. Aspects are a way of categorising your contacts. then, when you post stuff, you can control which aspects see your posts. Let’s say all your poker buddies join diaspora too. You could make an aspect called ‘poker’ and select it when you’re posting about upcoming games or inside jokes from previous games. Any contact can be in as many aspects as you want. So your sister-in-law Eva who you play poker with and who is also your coworker could be listed as ‘friends,’, ‘family, ‘work’, and ‘poker’.
right now, though, you’re looking at my profile. Click on ‘add contact’ and then select ‘make a new aspect’. A window will come up asking you what to call this aspect. Nobody but you will see the name, so type in there ‘pedantic tubists’. Click create. Now you have an aspect for slightly boring tuba players. However, the box will stick around, in case you feel like making lots of aspects. Just click cancel to get it to go away. Then hit reload on the page. Now you will see ‘pedantic tubists as one of your aspects. Select that one and whatever other ones you think I might belong in. I am now your contact! Click again on ‘stream’ at the top of the page to go back to your stream.

Posting / the stream

the stream page is like the feed on facebook or twitter.

at the top is the box you use for posting stuff. Let’s make a test post and make it public:

I am #newhere and I really love #kittens and #anarco-syndicalism

Click ‘preview’ to get a preview (you will have to close the helpful welcome popup to see the preview). Click post to post.
That post defaulted to public, which means it’s viewable to many people on diaspora. Remember when we said we liked #puppies,#zimba, #bicycling, #pizza, and #anarchism? Public posts usually have hashtags and those are the hashtags we said we’re interested in. When people post something public containing the hastag #pizza, it will end up in our stream. We just posted about #newhere, #puppies and #anarcho-syndicalism, so people following those tags will see our post.
If we want to post to just our aspects, we could type the post and then select the desired aspects instead of public. For example, we might type:

I prefer having a with at least 4 valves to a three valve compensating tuba.

And then, instead of public, select ‘pedantic tubsists’. We can set any post to as many aspects as we want.
These posts will show up in our stream, along with posts from our contacts and public posts from other people who have tags that we’re interested in.

Notifications

You may have noticed, at the head of every page is a little icon that looks like a satellite, that sometime shas a red number next to it. Those are our notifications. It lets you know somebody has commented on your post or started sharing with you. Etc. Click on it to get a list of notifications.
those notifications also go to your email address, which is something you might not want. To get to the settings, click on your name in the upper right hand corner, then click on ‘settings’. Near the bottom of the settings page, you can select when you want to get email. the other setting may also be interesting to you.

Connecting with your friends

Unfortunately, for now, the best way to find out if your friends are on diaspora is to ask them directly or via another platform, such as email, twitter, facebook, etc.
Let’s say you find out your friend Amy is on diaspora. You want to give her your disapora id. That is your username @ your pod. If you signed up as catman on sheckislove, your userid is catman@shreckislove.us. Or, if you signed up with the username potnoodle on despora.de, your disapora id is potnoodle@despora.de. This looks like an email address, because it’s got both your username and your pod. there might be more than one catman or more than one potnoodle on all of diaspora, but there is only one on your pod.
If you are ever unsure about your disapora name, you can find it by looking at your profile. Click on your name in the upper right hand corner and then click on profile.

It says your name across the top of the profile and then, to the right of that, it has your username @ your pod. That’s the ID you need to give to people you want to connect with.

Have fun

This is hopefully enough to get started. Leave a comment if you have questions.

Building SuperCollider 3.6 on Raspberry Pi

Raspberry Pi Wheezy ships with SuperCollider, but it ships with an old version that does not have support for Qt graphics. This post is only slightly modified from this (formerly) handy guide for building an unstable snapshot of 3.7 without graphic support. There are a few differences, however to add graphic support and maintain wii support.
This requires the Raspbian operating system, and should work if you get it via NOOBs. I could not get this to fit on a 4 gig SD card.
Note: This whole process takes many hours, but has long stretches where it’s chugging away and you can go work on something else.

Preparation

  1. log in and type sudo raspi-config, select expand file system, set timezone, finish and reboot
  2. sudo apt-get update
  3. sudo apt-get upgrade # this might take a while
  4. sudo apt-get remove supercollider # remove old supercollider
  5. sudo apt-get autoremove
  6. sudo apt-get install cmake libasound2-dev libsamplerate0-dev libsndfile1-dev libavahi-client-dev libicu-dev libreadline-dev libfftw3-dev libxt-dev libcwiid1 libcwiid-dev subversion libqt4-dev libqtwebkit-dev libjack-jackd2-dev
  7. sudo ldconfig

Build SuperCollider

  1. wget http://downloads.sourceforge.net/project/supercollider/Source/3.6/SuperCollider-3.6.6-Source.tar.bz2
  2. tar -xvf SuperCollider-3.6.6-Source.tar.bz2
  3. rm SuperCollider-3.6.6-Source.tar.bz2
  4. cd SuperCollider-Source
  5. mkdir build && cd build
  6. sudo dd if=/dev/zero of=/swapfile bs=1MB count=512 # create a temporary swap file
  7. sudo mkswap /swapfile
  8. sudo swapon /swapfile
  9. CC=”gcc” CXX=”g++” cmake -L -DCMAKE_BUILD_TYPE=”Release” -DBUILD_TESTING=OFF -DSSE=OFF -DSSE2=OFF -DSUPERNOVA=OFF -DNOVA_SIMD=ON -DNATIVE=OFF -DSC_ED=OFF -DSC_EL=OFF -DCMAKE_C_FLAGS=”-march=armv6 -mtune=arm1176jzf-s -mfloat-abi=hard -mfpu=vfp” -DCMAKE_CXX_FLAGS=”-march=armv6 -mtune=arm1176jzf-s -mfloat-abi=hard -mfpu=vfp” ..
    # should add ‘-ffast-math -O3’ here but then gcc4.6.3 fails
  10. make # this takes hours
  11. sudo make install
  12. cd ../..
  13. sudo rm -r SuperCollider-Source
  14. sudo swapoff /swapfile
  15. sudo rm /swapfile
  16. sudo ldconfig
  17. echo "export SC_JACK_DEFAULT_INPUTS="system"" >> ~/.bashrc
  18. echo "export SC_JACK_DEFAULT_OUTPUTS="system"" >> ~/.bashrc
  19. sudo reboot

Test SuperCollider

  1. jackd -p32 -dalsa -dhw:0,0 -p1024 -n3 -s & # built-in sound. change to -dhw:1,0 for usb sound card (see more below)
  2. scsynth -u 57110 &
  3. scide
  4. s.boot;
  5. {SinOsc.ar(440)}.play
  6. Control-.

Optional: Low latency, RealTime, USB Soundcard etc

  1. sudo pico /etc/security/limits.conf
  2. and add the following lines somewhere before it says end of file.
  3. @audio – memlock 256000
  4. @audio – rtprio 99
  5. @audio – nice -19
  6. save and exit with ctrl+o, ctrl+x
  7. sudo halt
  8. power off the rpi and insert the sd card in your laptop.
  9. dwc_otg.speed=1 # add the following to beginning of /boot/cmdline.txt (see http://wiki.linuxaudio.org/wiki/raspberrypi under force usb1.1 mode)
  10. eject the sd card and put it back in the rpi, make sure usb soundcard is connected and power on again.
  11. log in with ssh and now you can start jack with a lower blocksize
  12. jackd -p32 -dalsa -dhw:1,0 -p256 -n3 -s & # uses an usb sound card and lower blocksize
  13. continue like in step5.2 above

links:

This post is licensed under the GNU General Public License.

Personalised Jpegs for emailed wedding invitations

Let’s say you want to invite a bunch of people to your wedding and your soon-to-be-spouse wants some nice graphic you can mail to folks that has their name in it. You can do this! This script works with Linux and should work with OS X. It will require a few changes to work with windows.

Install some nifty software

I’m using both imagemagick and OptiPNG, both of which I got through apt-get. Probably, the png step is overkill and you could go straight to jpeg.
I’m also using Inkscape, Python and LibreOffice, but you can use any spreadsheet you want.

Make the graphic template

  1. Find some nice border of some kind. I drew one and scanned it, but there are other options.
  2. Open your nice border in inkscape (or other svg editor).
  3. Put all the text you want into your graphic, with the font you want.
  4. In the part where you want their name, put GUEST_NAME
  5. Save your lovely creation as template.svg

Compile names and email addresses

In LibreOffice, open a new spreadsheet and make a bunch of entries for your guests.
The first column should be email addresses.
If you are NOT saving the images, then the next column can all say ‘invite’ for every single entry. If you want to save the jpegs (say to post them to facebook walls as well as emailing them), then give them a short name associated with the person. This will be a file name, so it should be all one word that starts with a letter and contains only letters, numbers and underscores.
The last column should be the name you want to appear in the invite. You know from making your template how much space you have for names, so keep that in mind, if you’re deciding to put in Reverend Doctor Julius Milliband Cameron III’s full name or not. Or you may need to go back and tweak your template.
Your speadsheet should look something like this:

foo@example.com jen Jennifer
bar@example.com ralph Ralph & Morris
dr_rev@example.com ju Dr Cameron

Save this spreadsheet as guests.csv

The script

Get ready

Save your template, your spreadsheet and the script (cut and past from below), all to the same folder on your system. Call the script doemail.py
You will need to modify this script a bit.
Put in your own text where you see the part that says YOUR OWN TEXT. You’ll see it asks for your own text twice. One of those times is plain text. The other one is HTML. the plain text one is just text. Don’t include any html tags. If you put in links, you just have to put in the link as plain text. In the HTML part, you can use a lot of markup, including <a href=”blah.com”>blahblah</a> tags and whatnot. You can do inline CSS, if you like, but it’s email, so keep it relatively simple. In both sections, don’t forget to include a link to your website. And if you are using an online form for RSVPs, link to that as well.
You’ll also need to put in your own email address, and your own password. If you are using gmail, you can use an application-specific password.
Finally, you will also need to put in the smpt server for your mail server. Near the top of the file, you’ll see lines for hotmail and gmail. Delete any that don’t apply to you. If you are using a different server, you’ll have to find out what to put there.
If you want to save the nice jpegs, say to also post them in facebook messages, then look for the line:

jpegname = "/tmp/"+name+".jpeg"

and change the ‘/tmp/’ part to another directory on your system.
You need to make the script executable. Open the terminal application and cd to the directory with the script, template, and spreadsheet. Type:

 chmod +x doemail.py

This will make the script executable as a program you can run. then, double check your spreadsheet is ok. Type:

less guests.csv

It should look like:

foo@example.com,jen,Jennifer
bar@example.com,ralph,Ralph & Morris
dr_rev@example.com,ju,Dr Cameron

If you see semicolons instead of commas, then you need to change your script to tell it that. Change

guestreader = csv.reader(csvfile)

to

guestreader = csv.reader(csvfile, delimiter=';')

To run the script, still from your terminal, type:

 ./doemail.py

The Actual script to cut and paste

#! /usr/bin/python

import smtplib
import re
import subprocess
import os
import cgi
import uuid
import csv

from subprocess import call
from email.mime.multipart import MIMEMultipart
from email.mime.text import MIMEText
from email.mime.image import MIMEImage
from email.mime.multipart import MIMEMultipart
from email.mime.text      import MIMEText
from email.mime.image     import MIMEImage
from email.header         import Header    


# me == my email address
me = "example@hotmail.co.uk"
password = "yourEmailPassword"
smpt_server = "smtp.live.com:587" #hotmail
smpt_server = "smtp.gmail.com:587" #gmail

with open('guests.csv') as csvfile:
    guestreader = csv.reader(csvfile)
    for row in guestreader:
        you = row[0]
        name = row[1]
        salutation = row[2]

        name = ''.join(name.split())


        text = "Dear " + salutation + ",nn  YOUR TEXT GOES HERE http://YOURWEBSITE.COM"


        html = """
<html>
  <head></head>
  <body>
    <p>
<a href="YOUR WEDDING WEBSITE">
        """
        html = html + "<img src="cid:{}@example.com" alt="[More Information]" /></a></p>n<p>Dear {},</p>".format(img['cid'], salutation)
        html = html + """
<p>YOUR TEXT GOES HERE</p>
</body></html>
    </p>
  </body>
</html>
        """


        print (salutation)

        # Create message container - the correct MIME type is multipart/alternative.
        msg = MIMEMultipart('related')
        text_msg = MIMEMultipart('alternative')
        msg['Subject'] = Header(u'Wedding Invitation', 'utf-8')
        msg['From'] = me
        msg['To'] = you


        # make the image

        filename = "/tmp/"+name+".svg"
        pngname = "/tmp/"+name+".png"
        jpegname = "/tmp/"+name+".jpeg"

        svg = open("template.svg");
        svgn = open(filename, 'w');
        lines = svg.read().split('n')
        for line in lines:
            line = re.sub('GUEST_NAME',re.sub('&', '&amp;', salutation), line)
            svgn.write(line)
        #endfor

        svg.close()
        svgn.close()

        os.system("inkscape -f " + filename + " -e " + pngname)
        os.system("optipng " + pngname);
        os.system("convert -compress JPEG -quality 87 " + pngname + " " + jpegname);

        os.system("rm " + filename)

    
        # attach the image to the email

        img = dict(title=u'Invitation', path=jpegname, cid=str(uuid.uuid4()))
                                                        #cid=name)
                                                        #cid=str(uuid.uuid4()))
        with open(img['path'], 'rb') as file:
            msg_img = MIMEImage(file.read(), name=os.path.basename(img['path']))
            #msg.attach(msg_img)
            msg_img.add_header('Content-ID', '<{}@example.com>'.format(img['cid']))
            msg_img.add_header('Content-Name', img['cid'])
            msg_img.add_header('X-Attachment-ID', '{}@example.com'.format(img['cid']))
            #msg_img.add_header('Content-Disposition', 'attachment', filename=os.path.basename(img['path']))
            msg_img.add_header('Content-Disposition', 'inline', filename=os.path.basename(img['path']))

        print('<{}>'.format(img['cid']))


        # Create the body of the message (a plain-text and an HTML version).


        # Record the MIME types of both parts - text/plain and text/html.
        part1 = MIMEText(text, 'plain')
        part2 = MIMEText(html, 'html')

        # Attach parts into message container.
        # According to RFC 2046, the last part of a multipart message, in this case
        # the HTML message, is best and preferred.
        text_msg.attach(part1)
        text_msg.attach(part2)
        msg.attach(text_msg)
        msg.attach(msg_img)


        # Send the message via local SMTP server.
        server = smtplib.SMTP(smpt_server)
        server.ehlo()
        server.starttls()
        server.login(me,password)
        # sendmail function takes 3 arguments: sender's address, recipient's address
        # and message to send - here it is sent as one string.
        server.sendmail(me, you, msg.as_string())
        server.close()
        #server.quit()

        os.system("rm " + pngname)

    #end for (going through rows in the database)
    csvfile.close()
#end with    

A better script for Wacom with screen geometry changes

Why and how

This is a better script to set your stylus setting to match a changed resolution, like if you plugged in to a projector. If you are mirroring screens, the geometry may change, so that instead of using your whole 16/9 ratio screen, you’re only using a 4/3 box in the middle. The problem you may run into is that your stylus does not adjust and so where you’re pointing the stylus may differ significantly from where the pointer appears on the screen. This script fixes that.
There are some dependencies: xsetwacom xrandr, and wcalc. Make sure you have xsetwacom by typing:

which xsetwacom

If it doesn’t give you a path, you need to:

sudo apt-get install xsetwacom

Do the same for xrandr. Finally, you need wcalc, which is not installed by default. Type:

sudo apt-get install wcalc

The script is below. To save it, copy it to the clipboard starting from just below the ‘Script’ subheader and ending just above the ‘Commentary’ subheader. Then type the following in the terminal:

cd
mkdir bin
cd bin
touch stylus_script.sh
chmod +x stylus_script.sh
gedit stylus_script.sh

Don’t worry if you get an error saying bin already exists. Just carry on.

Gedit should open with a blank file. Paste the script into that file. Then save and quit. You may not need to make any changes. (See commentary.)
You’ll want to run this script when you plug into a projector (after you set the resolution you’re going to use) and then again when you unplug from it. Do this in the terminal by typing:

~/bin/stylus_script.sh

You can run these from any terminal window, at any time and it should work. If you get errors or it just doesn’t do anything, see the commentary below.

Script

#!/bin/bash


function touch_ratio {
 #get pen geometry
 LINE=`xsetwacom get "Wacom ISDv4 E6 Pen stylus" area`
 echo ${LINE}
 TabTx=`echo ${LINE} | awk '{ print $1 }'`
 TabTy=`echo ${LINE} | awk '{ print $2 }'`
 TabBx=`echo ${LINE} | awk '{ print $3 }'`
 TabBy=`echo ${LINE} | awk '{ print $4 }'`

 TouchHeight=$((${TabBy} -${TabTy}))
 TouchWidth=$((${TabBx} -${TabTx}))

 TouchRatio=`wcalc -q ${TouchWidth}/${TouchHeight}`

}


# get screen geometry
LINE=`xrandr -q | grep Screen`
WIDTH=`echo ${LINE} | awk '{ print $8 }'`
HEIGHT=`echo ${LINE} | awk '{ print $10 }' | awk -F"," '{ print $1 }'`
RATIO=`wcalc -q ${WIDTH}/${HEIGHT}`


touch_ratio

# is the touch ratio different from the screen ratio?
change=`wcalc -q abs(${TouchRatio}-${RATIO})>0.01`
wcalc -q abs(${TouchRatio}-${RATIO})
if [[ ${change} != 0 ]] 
  then

 #they differ

 # first try resetting
 xsetwacom set "Wacom ISDv4 E6 Pen stylus" ResetArea
 xsetwacom set "Wacom ISDv4 E6 Pen eraser" ResetArea 
 xsetwacom set "Wacom ISDv4 E6 Finger touch" ResetArea

 # how about now?
 touch_ratio
 
 if [[ `wcalc -q abs(${TouchRatio}-${RATIO})>0.01` != 0 ]] #they differ
   then

  if [[ ${TouchRatio} > ${RATIO} ]] # width has shrunk
    then
   # use existing height values
   TYOFFSET=${TabTy};
   BYOFFSET=${TabBy};

   # calculate new width values
   # width = ratio * height
   
   NewTabWidth=`wcalc -q -P0 ${RATIO}*${TouchHeight}`
   TabDiff=$(( (${TouchWidth} - ${NewTabWidth}) / 2));

   TXOFFSET=$((${TabTx} + ${TabDiff}));
   BXOFFSET=$((${TabBx}- ${TabDiff}));

    else # height has shrunk

   # use existing width values
   TXOFFSET=${TabTx};
   BXOFFSET=${TabBx};

   # calculate new height values
   # height = width / ratio

   NewTabHeight=`wcalc -q -P0 ${TouchWidth}/${RATIO}`
   TabDiff=`wcalc -q (${TouchHeight}-${NewTabHeight})/2`
   
   TYOFFSET=`wcalc -q ${TabTy}+${TabDiff}`
   BYOFFSET=`wcalc -q ${TabBy}-${TabDiff}`

    fi


  echo ${TXOFFSET} ${TYOFFSET} ${BXOFFSET} ${BYOFFSET}
  xsetwacom set "Wacom ISDv4 E6 Pen stylus" Area ${TXOFFSET} ${TYOFFSET} ${BXOFFSET} ${BYOFFSET}
  xsetwacom set "Wacom ISDv4 E6 Pen eraser" Area ${TXOFFSET} ${TYOFFSET} ${BXOFFSET} ${BYOFFSET}
  xsetwacom set "Wacom ISDv4 E6 Finger touch" Area ${TXOFFSET} ${TYOFFSET} ${BXOFFSET} ${BYOFFSET}

   fi
 #gnome-control-center wacom
  else
 echo normal resolution
fi

Commentary

If this script doesn’t work, it may be because the name of your wacom devices differs from mine. To find the names of your devices, type:

xsetwacom --list

You will get a list of your wacom devices. Mine looks like this:

Wacom ISDv4 E6 Pen stylus        id: 10 type: STYLUS    
Wacom ISDv4 E6 Finger touch      id: 11 type: TOUCH     
Wacom ISDv4 E6 Pen eraser        id: 15 type: ERASER    

In this script, I use the information at the far left: ‘Wacom ISDv4 E6 Pen stylus’ and the two identifiers below that. If your device list has different names, then replace the names in the script with the names of your devices. So if you have, ‘Wacom ISDv7 E13 Pen Stylus’, you would use that instead. These lines show up multiple places in the script, so if you need to change it, make sure you get it every time, down to the bottom of the file.

How it works

This script gets the geometry of your screen and the geometry of your stylus and calculates the width/height ratio for each. If this differs by more than a fractional amount, it calculates a new width or height for your stylus.

Script to modify wacom tablet settings to reflect a changed screen geometry

Update

This script has now been replaced with a better version: http://www.celesteh.com/blog/2013/05/26/a-better-script-for-wacom-with-screen/. You will want to use the newer script instead.

Why you would need this and how to use it

Ok, let’s say you have a tablet computer and you want to mirror your display to a projector and you want to use your stylus. Your screen geometry may change, so that instead of using your whole 16/9 ratio screen, you’re only using a 4/3 box in the middle. The problem you may run into is that your stylus does not adjust and so where you’re pointing the stylus may differ significantly from where the pointer appears on the screen. This script fixes that.
There are some dependencies. Make sure you have xsetwacom by typing:

which xsetwacom

If it doesn’t give you a path, you need to: sudo apt-get install xsetwacom
and you need wcalc, which is not installed by default. Type:

sudo apt-get install wcalc

The script is below. To save it, copy it to the clipboard starting from just below the ‘Script’ subheader and ending just above the ‘Commentary’ subheader. Then type the following in the terminal:

cd
mkdir bin
cd bin
touch stylus_script.sh
chmod +x stylus_script.sh
gedit stylus_script.sh

Don’t worry if you get an error saying bin already exists. Just carry on.
Gedit should open with a blank file. Paste the script into that file. Before you save and quit, you will need to make a small change to the top of the script with your own default screen geometry. To find this out, unplug all projectors, etc and open your system settings and look at displays. Set your display to however it is normally. The resolution should have two numbers. In my case they are 1366 x 768. The first is the width and the second is the height. Therefore, at the top of my script, I have:

# change these lines to match your normal screen geometry (note: we assume this normally takes up your whole screen)
NormalWidth=1366
NormalHeight=768

If your display is 1280 x 720, then you would change that to:

NormalWidth=1280
NormalHeight=720

Once you have the correct values in there, save it and you don’t need to change it again. You only have to do all of the above just the one time.
You’ll want to run this script when you plug into a projector (after you set the resolution you’re going to use) and then again when you unplug from it. Do this in the terminal by typing:

source stylus_script.sh

Do it in the same terminal both times.(Further optional commentary about that and other issues is at the bottom of the post.) When you run it the second time, after unplugging the projector, it should put your stylus settings back to normal. Your settings should also reset to normal if you log out and log back in again. If you can’t run this twice from the same terminal, or if that doesn’t work, then you will need to log out and back in.

Script

#!/bin/bash

# check the screen geometry

# change these lines to match your normal screen geometry (note: we assume this normally takes up your whole screen)
NormalWidth=1366
NormalHeight=768

# the script


NormalRatio=`wcalc -q ${NormalWidth}/${NormalHeight}`

LINE=`xrandr -q | grep Screen`
WIDTH=`echo ${LINE} | awk '{ print $8 }'`
HEIGHT=`echo ${LINE} | awk '{ print $10 }' | awk -F"," '{ print $1 }'`
RATIO=`wcalc -q ${WIDTH}/${HEIGHT}`


if  [[ ${NormalRatio} != ${RATIO} ]] # screen is not in normal configuration
  then
 if [[ (! $ALREADYRECALIBRATED ) || ($ALREADYRECALIBRATED == 0)]] # we haven't already adjusted
   then
  LINE=`xsetwacom get "Wacom ISDv4 E6 Pen stylus" area`

  export TabTx=`echo ${LINE} | awk '{ print $1 }'`
  export TabTy=`echo ${LINE} | awk '{ print $2 }'`
  export TabBx=`echo ${LINE} | awk '{ print $3 }'`
  export TabBy=`echo ${LINE} | awk '{ print $4 }'`

  OldTabHeight=$((${TabBy} -${TabTy}))
  OldTabWidth=$((${TabBx} -${TabTx}))

  if [[ ${NormalRatio} > ${RATIO} ]] # width has shrunk
    then
   # use old height values
   TYOFFSET=${TabTy};
   BYOFFSET=${TabBy};

   # calculate new width values
   # width = ratio * height
   
   NewTabWidth=`wcalc -q -P0 ${RATIO}*${OldTabHeight}`
   TabDiff=$(( (${OldTabWidth} - ${NewTabWidth}) / 2));

   TXOFFSET=$((${TabTx} + ${TabDiff}));
   BXOFFSET=$((${TabBx}- ${TabDiff}));

    else # height has shrunk

   # use old width values
   TXOFFSET=${TabTx};
   BXOFFSET=${TabBx};

   # calculate new height values
   # height = width / ratio

   NewTabHeight=`walc -q -P0 ${OldTabWidth}/${RATIO}`
   TabDiff= $(( (${OldTabHeight} - ${NewTabHeight}) / 2));
   
   TYOFFSET=$((${TabTy} + ${TabDiff}));
   BYOFFSET=$((${TabBy}- ${TabDiff}));

    fi
  #echo ${TXOFFSET} ${TYOFFSET} ${BXOFFSET} ${BYOFFSET}
  xsetwacom set "Wacom ISDv4 E6 Pen stylus" Area ${TXOFFSET} ${TYOFFSET} ${BXOFFSET} ${BYOFFSET}
  xsetwacom set "Wacom ISDv4 E6 Pen eraser" Area ${TXOFFSET} ${TYOFFSET} ${BXOFFSET} ${BYOFFSET}
  xsetwacom set "Wacom ISDv4 E6 Finger touch" Area ${TXOFFSET} ${TYOFFSET} ${BXOFFSET} ${BYOFFSET}

  export ALREADYRECALIBRATED=1
   fi
 #gnome-control-center wacom
  else
 echo normal resolution
 # check if we've done some past calibration
 if [[ $ALREADYRECALIBRATED  && $ALREADYRECALIBRATED == 1 ]]
   then
  xsetwacom set "Wacom ISDv4 E6 Pen stylus" Area $TabTx $TabTy $TabBx $TabBy
  echo previous calibration restored
  export ALREADYRECALIBRATED=0
   fi
fi

Commentary

If you chose to run this some other way than typing ‘source stylus_script.sh’ in the terminal when plugging in a projector and then running it the same way again in the same terminal when unplugging the projector, it will not be able to restore your normal settings. You can try running the calibration tool to fix your settings or else log out and log back in again. The reason it needs to be run twice from the same terminal is because it stores your default settings in environment variables. There are undoubtedly better ways of doing this, so please leave a comment if you’ve got code that does it better.
If you normally run your screen display in a different ratio than the physical device, I’m not 100% the maths for this script will be correct for you. Let me know in the comments if you need help in this case.
The tablet height as seen by the wacom device is very different than the height in pixels. This makes sense because pixel size can change dramatically but the physical size of screen in use will stay the same. I assume that any change in display size will be letter-boxed either on the top and bottom or on the sides, but will always be centred and will never have blank space on both the sides and the top and bottom at the same time. If you don’t follow these assumptions, this script will require some modifications to work for you.

A useful script

The best way to remember to do something when you’re going to run some important program is to put in the program itself. Or at the very least, put it in a script that you use to invoke the program.
I have a few things I need to remember for the performance I’m preparing for. One has to do with a projector. I’m using a stylus to draw cloud shapes on my screen. And one way I can do this is to mirror my screen to a projector so the audience can see my GUI. However, doing this usually changes the geometry of my laptop screen, so that instead of extending all the way to the edges, there are empty black bars on either side of the used portion of my display. That’s fine, except the stylus doesn’t know and doesn’t adjust. So to reach the far right edge of the drawn portion of the screen, I need to touch the far right edge of the drawn portion, which puts over a centimetre between the stylus tip and the arrow pointer. Suboptimal!
Ideally, I’d like to have any change in screen geometry trigger a script that changes the settings for for the stylus (and I have ideas about how that may or may not work, using upstart, xrandr and xsetwacom), but in the absence of that, I just want to launch a manual calibration program. If I launch the settings panel, there’s a button on that that launches one. So the top part of my script checks if the calibration is different than normal and launches settings if it is.
The next things I need to remember are audio related. I need to kill pulseaudio. If my soundcard (a Fast Track Ultra) is attached, I need to change the amplitude settings internally so it doesn’t send the input straight to the output. Then I need to start jack using it. Or if it’s not attached, I need to start jack using a default device. Then, because it’s useful, I should start up Jack Control, so I can do some routing, should I need it. (Note: in 12.04 if you start qjackctl after starting jackd, it doesn’t work properly. This is fixed by 13.04.) Finally, I should see if SuperCollider is already running and if not, I should start it.
That’s a bit too much to remember for a performance, so I wrote a script. The one thing I need to remember with this script is that if I want to kill jack, it won’t die from Jack Control, so I’ll need to do a kill -9 from the prompt. hopefully, this will not be an issue on stage.
This is my script:

#!/bin/bash


# first check the screen

LINE=`xrandr -q | grep Screen`
WIDTH=`echo ${LINE} | awk '{ print $8 }'`
HEIGHT=`echo ${LINE} | awk '{ print $10 }' | awk -F"," '{ print $1 }'`

if  [[ ${WIDTH} != 1366 || ${HEIGHT} != 768 ]]
  then
 gnome-control-center wacom
  else
 echo normal resolution
fi


# now setup the audio

pulseaudio --kill

# is the ultra attached?
if aplay -l | grep -qi ultra
  then
 echo ultra
 
 #adjust amplitude
 i=0
 j=0
 for i in $(seq 8); do
         for j in $(seq 8); do
                 if [ "$i" != "$j" ]; then
                         amixer -c Ultra set "DIn$i - Out$j" 0% > /dev/null
                 else
                         amixer -c Ultra set "DIn$i - Out$j" 100% > /dev/null
                 fi
                 amixer -c Ultra set "AIn$i - Out$j" 0% > /dev/null
         done
 done

 #for i in $(seq 4); do 
 # amixer -c Ultra set "Effects return $i" 0% > /dev/null 
 #done 

 #start jack
 jackd -d alsa -d hw:Ultra &
  else
 #start jack with default hardware
 jackd -d alsa -d hw:0 &
fi

sleep 2

# jack control
qjackctl &

sleep 1

# is supercollider running?
if ps aux | grep -vi grep | grep -q scide
  then
 echo already running
  else
 scide test.scd &
fi