Peer Work

There is a very handy Moodle plugin called peer work, which you can use to allow students doing group work to assess each other’s contributions and scale the group marks accordingly. In a document authored by Dr Sean Williams, he notes that benefits for students include “a greater engagement with critical thinking; greater awareness of marking criteria; more perceived fairness in assessment”. This plugin saves a lot of paperwork and spreadsheet wrangling.

The upsides of this plugin are clear, but unfortunately, the documentation for it is sometimes less clear, alas. Although, it does cover some aspects of it’s use very well. This blog post is meant to cover some gaps.

Groups

As this plugin is for group work, you’ll need to create groups on your moodle, which is well-documented.

Using Likert scales

In this plugin, students are asked to rate each other’s skill and/or participation according to a Likert scale. Dr. Williams suggests this should be 0-5. You will first need to create a scale, which has a good moodle documentation page. Open your course in moodle. In the left hand column, click grades. Under grades, click scales. Under scales, at the bottom, click “the “Add a new scale” button. You will have to provide a name for their scale and commas separated list of scale values from low to high. The values I have used are: No contribution, Minimal Contribution, Reasonable contribution, Very good contribution, Excellent Contribution. The name I chose for this scale is “Peer Assessment Scale.”

When you create a new Peer Work item on the moodle page, it should look familiar to regular moodle users. The questions for peer evaluation go in the “Assesment Criteria Settings” section of the settings. You will set several criteria, eg “How was this student’s attendance at group meetings?” Each criteria has a description and a “scoring type”. For the scoring type, pick the scale that you made.

Using my new scale with the peer assessment questions

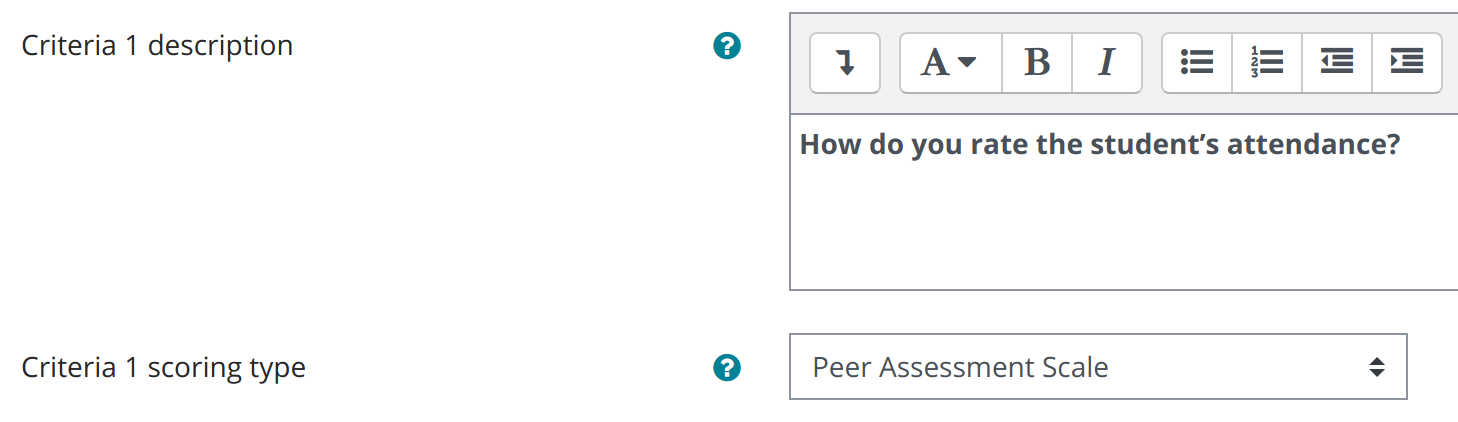
Students should see your Likert scale for the question. You must set the scale per question. You can use the one scale you made, or if you feel it’s not a good fit for the question, you can make custom scales for each item. For this criteria, I could have a specific scale that started with: Never attended, Attended Rarely, … etc.
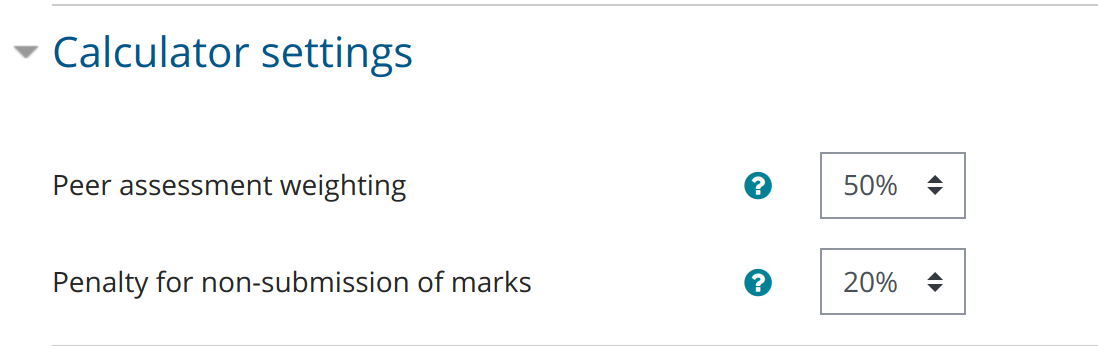
Calculator Settings

When you are setting up the plugin, you’ll need to set the calculator setting. This sets how much the students marks are effected by their peer evaluations. Dr Williams says, “By default this is set to 50%, meaning that 50% of the group mark is given directly, and 50% is subject to the multiplier. If this gives a spread of marks judged to be too narrow, then it can be adjusted. Normally this shouldn’t be more than 60% or less than 40%.”

There’s also a penalty for non-submission, where they get dinged if they fail to evaluate each other. The default is 20%. Dr. Williams suggests students should be told this early.

The calculator settings

How this multiplier works is explained in a PDF buried in the plugin’s source code which is a copy of this web page. The student’s peer scores are used to calculate a multiplier for the group grade. This is done so that nobody is penalised if a peer’s marks are missing, skew low or skew high.

Each student gets a percentage mark – the multiplier. If the peer weighting is 50% and you’ve given them a score of 100, they get 50 marks from the group grade (as in 50% is directly the group grade) and the other half of the mark is calculated by multiplying it by their personal percentage mark. So if the student Bob gets an 80 for his personal percentage mark, his overall mark is 50 + (50 * 0.8) = 90.

The percentage mark can exceed 100% in some cases. If Alice’s group has gotten a 90, and Alice has gotten a percentage of 115, her score would be 45 + (45 * 1.15) = 96.75.

Student marks are capped at 100.

Running an online student concert

I wanted to come up with the most straightforward possible setup, so that students would be able to copy it and run their own events with minimal fuss.

This plan uses Twitch, which has two tremendous advantages. It has a performance rights society license, so everyone is free to do covers with no copyright consequences. (Just don’t save the stream to twitch.) The other is that the platform is designed around liveness, so if there are gaps in the stream, it’s not a problem. This means that no stream switching is required.

Student skills required

The students need to be able to get their audio into a computer. This might entail using a DAW, such as Reaper, or some sort of performance tool. They need to be able to use their DAW or tool in a real-time way, so that performing with it makes sense. If they can create a piece of music or a performance with software that they are capable of recording, then they have adequate skills.

This checklist covers all the skills and tools that a Mac or Linux user will need to play their piece. It will work for many, but not all, Windows users. This is because Windows setups can vary enormously.

Once everyone is able to stream to their own Twitch channel, they have the skills required to do the concert.

Setup and Organisation

You will need a twitch account dedicated to your class or organisation. You will also need a chatroom or other text-based chat application to use as a “backstage”. Many students are familiar with Discord, which makes it an obvious choice. Matrix chat is another good possibility. If you go with discord, students will need to temporarily disable the audio features of that platform.

As the students are already able to stream to Twitch, the only thing that will change for them is the stream key. Schedule tech rehearsals the day of the concert. Arrange that the students should “show up” in your backstage chat. At those rehearsals, give out the stream key for your channel’s stream. Give the students a few minutes to do a test stream and test that their setup is working.

The students should be instructed to wait until instructed to start their streams and to announce in the chat when they stop. If they get disconnected due to any kind of crash, they should check in in the chat before restarting. Once they finish their performance, they should quit OBS so they do not accidentally restart their stream.

When it’s call time for the concert, they also need to show up in the backstage chat. They should be aware of the concert order, but this may also change as students encounter technical challenges. You or a colleague should broadcast a brief welcome, introductory message which should mention that there will be gaps between performances as the stream switches.

As you stop broadcasting, tell the first student to start and the next student to be ready (but not go yet). The first student will hopefully remember to tell you when done and stop their stream. As their stream ends, you can tell the next student to go. You should be logged into the Twitch web interface so you can post in the chat who is playing or about to play.

After the concert ends, reset the stream key. This will make sure their next twitch stream doesn’t accidentally come out of your organisation’s channel.

Conclusion

The downsides of this steup is that there will be gaps in the stream. If a student goes wildly over time, it’s hard to cut them off. However, the tech requirements do not need any investment from your institution and, again, they should be able to organise their own events in a similar way using the skills they learned from participating in this event.

Performance Disasters

Some of my students have stage fright and don’t want to perform. This circumstance is highly relatable. I thought it might be helpful to share some stories of stage fight and performance gone wrong.

I used to get terrible stage fright. The way I got over it was to keep going on stage, a lot, despite being absolutely terrified every time. As a youth, I got relatively used to playing in front of strangers, but one time, in a youth group, I was playing trumpet in front of my peers and got so alarmed, I couldn’t get my lips to buzz.

More recently, I wrote a piece performed with a gamepad and when I went to perform it, found my hands were shaking too much to play it!

For me, just giving it ago, despite the fear, was got me through it. But, perhaps for some, an exercise in “what’s the worst that could happen”? will help.

Let’s watch a John Cage performance. Do you think the audience’s reaction indicates success or failure?

John Cage performs Water Walk on the TV show I Have a Secret

Ok, so the audience laughed but he said he was ok with that and his performance got broadcast out on national television, so perhaps the exposure was worth the mirth. But did you notice anything wrong with the performance?

Things that I noticed going wrong included

  • The radios were being plugged in. This was due to disagreement in the unions about who’s job it was to plug them in. (The moral of that story is to keep the union on side. Solidarity. Also, if you’re doing something weird, be patient while they go through the normal setup process. They’re used to being talked down to, so don’t offer instructions or suggestions unless their normal setup doesn’t work.)
  • The blender caught fire.
  • The rubber ducky was completely inaudible.

Two of these three things were huge problems. Radios are a key part of the piece. The blender situation was also quite alarming and changed the flow of the piece, as the crushed ice used later on was not available. Cage had to be adaptable and think on his feet in a performance situation that had numerous disasters before and duing.

Most people don’t notice the problems because he kept his cool throughout. This kind of composure is the product of experience. Things go wrong, but the show must go on. For people unused to performance, it’s likely that you will seem nervous. You are nervous. But with practice and experience, you too can keep your cool. After all, what’s the worst that can go wrong?

https://twitter.com/etgesofspain/status/1379444619272937472

Telematic Performance and e-learning

I’ve put some resources up for my students and I’m going to copy them here in case they’re of wider interest. I’ve made instructional videos for using some of the tools.

Online Meetings / Online Jams

  • Jitsi Meet– Doesn’t spy on you or sell your data. Can be used via mobile device with a free app or accessed via a web browser on your computer. Users without either of these can call in using local numbers in several countries. Can record to Dropbox or stream to YouTube. Works best with chromium/chrome. Some people have good luck with Firefox. Safari has poor results.

Telematic Performance Software and Platforms

  • OBS Studio – Stream Audio and Video and/or record your desktop. (How to use on mac.)
  • Upstage – Cyber performance platform, mostly used by artists.
  • LNX Studio – Collaborative platform for making popular music across a network. Mac only. Last updated in 2016, so may not work with the newest macs.
  • Soundflower – Zero latency audio routing for mac. (Use it to get audio to and from jitsi meet and OBS.)
  • BlackHole – Even more zero latency audio routing for mac. (See above.)

Video Tutorials

Made by me. My students like videos. I’ll post text here later. All of these are for Mac.

Getting Started with SPEAR

Sinusoidal Partial Editing Analysis and Resynthesis is a zero-cost program for Macs and Windows. It works with the latest Macintosh system update.

It is a program that does FFTs of audio files to display a spectrum which you can then edit. It’s not as fully-featured as AudioSculpt, but it’s compatible with your new Mac and the price is right.

When you open a file, it starts by asking you a few questions.

Sinusoidal Partials Analysis window

One of the things it asks is the bin spacing for the FFT. This should be narrower for low pitched sounds and can be wider for higher sounds. If you have a stereo file, it asks which channel you want to process. It works best with mono, so if you have a stereo file, you may wish to mix it down to mono or to process the left and right separately.

Constituent frequencies of a given sound, if they’re loud enough to be important, are called partials. All of the lines in the big window represent partials. Ones towards the bottom are lower in pitch and ones above are higher. Time moves from left to right. The darker partials are louder.

If you want to hear the sound, press space bar. If you don’t hear anything check the preferences and make sure audio is going to to correct output.

The preferences window showing the audio pane, with Core Audio Built-in Output selected.

The transform menu contains a several things you can do to the sound. If no partials are selected, these will apply to every partial. Otherwise, they apply to only the ones which are selected.

The Transform menu

To select a single partial, pick the arrow in the tools menu, and then click on the partial. To select a rectangular area, pick the plus sign, to select a free area, pick the lasso. You can shift click or shift select to grow a selection area. Also see the edit menu for options like inverting your selection.

The tools window

When you hover over an item in the tools menu, the name of the item appears. These items include time stretching, moving, shifting, transposing and drawing in new partials. You can use the time stretch tool to just stretch selected partials in one part of the file.

You can save files, which are the analysis files that SPEAR has created and which you’ve modified. You can also save a rendering as an audio file. There are a few choices with this. You can do an additive re-synthesis using a bunch of sine waves or an IFFT. If unsure, experiment to see what sounds best with the particular file you’re editing.

The Sound menu

There is no manual for SPEAR, but there is a single webpage with some explanations. Or there are some technical papers you can fine on the program’s website.

This program has been written with GTK portability in mind, but I could not find a link to source code and no linux binaries seem to be available. I have written to the author to ask if he intends to make this a FLOSS project, as it seems like a really good fit for the Ubuntu Studio distribution. I’ll update if I hear back. Sending an email like this, is, of course, asking a favour, so I’m a bit worried that he might get this question a lot. In any case, releasing a mac compatibility update was definitely a public good.

Teach about trans people

In our current political climate, I think it’s important for teachers and academics in every discipline to take a stand in favour of diversity and inclusion. One important way we can do that is to highlight contributions in our field by members of minority groups. One way into this in any discipline is by including some history. So in computer science, teachers could mention that Alan Turing was gay and that Grace Hopper, inventor of the compiler (and, indeed of the idea of compiling), was a woman.

When teaching music and presenting a piece of music to students, I give a few biographical notes about the composer which are mostly related to their musical background and influences. This is also a good time to mention any minority status. This is important because students will otherwise tend to assume that everyone is a cis, straight, white man. It can seem a bit weird to mention that someone is gay, for example, without other context. There are a few ways to address this.

If a person’s minority status is known to effected their opportunities, then this is is a good way to bring it up. To take an example, Milton Babbit was going to be the first director of The Columbia-Princeton Electronic Music Center. When they realised he was Jewish, they rescinded the offer and hired someone else. After a year, they came back to Babbit and re-offered him the job. It’s good to tell students about this and condemn it, to let them know that discrimination was more recent and widespread than they may have imagined and to give the idea that it was wrong and should be opposed.

Another way to bring up somebody’s status as a minority applies if they were a member of a milieu at least partly defined by minority participation. So, for example, a lot of jazz musicians are black and, indeed, some American forms of free improvisation were called “black music”. In general, mentioning milieus is good because it gives students a sense of larger scenes and places they might do additional research. It also communicates that minority involvement was significant and larger than the few individuals discussed in class.

Otherwise, a way to bring up a person’s membership in minority groups is to just tell students you think it’s important to mention it so they know the field is diverse. This is also good because it demonstrates that inclusion is valuable.

It’s important not to make somebody’s status as a minority the defining thing about them. They’re a topic for the class because they relate to the subject the class is covering, not because they’re a minority. One must strike a balance so as to communicate that minorities have historically been part of a discipline and contributions are important and will continue. Over-emphasising their minority status can backfire and make it seem like they’re being highlighted for being weird and different. I try to bring minority community membership up just once and then not mention it again unless it’s relevant in their work.

With contested identities, such as trans people,talking about their background models how to speak respectfully. It’s important that if a student starts giggling or otherwise treating this as a joke, that they’re told to stop. Here is a guide for how to talk about trans people in the classroom.

  • If the person is not living, you should definitely mention that they were trans.
  • If the person is living, you can only say they were trans if the person has consented to this by being public about their trans status.
  • If a person has transitioned to being a woman, the term to use when talking about them being trans is “trans woman” and the pronoun to use is “she”. If they have transitioned to being a man, the term to use when talking about them being trans is “trans man” and the pronoun to use is “he”. If someone has transitioned to a non-binary gender identity, the term to use when talking about this is “enby” (which is a pronunciation of the initials N.B.) and the pronoun to use is “they”. In every case, if the person has expressed a different label or pronoun, you should follow their preferences.
  • Always use their current pronoun, no matter when in their life you are speaking about them.
  • Do not bring up somebody’s previous name without a good reason. Mention it as little as possible.
  • If any of this makes you feel awkward, practice this part of your classroom presentation on a friend until you feel normal about it.

To give an example of how I might talk about this:

Wendy Carlos has done a lot of work on spatialisation and has some good blog posts about it – I’ve put the links on Moodle. She is an American composer who started out at Columbia-Princeton, but then went in a less experimental/more popular direction. She’s best known for working with Moog synthesiser and worked directly with engineers there to design modules, which she used to do several film sound tracks, including Tron and A Clockwork Orange. She initially made her name with Switched on Bach which was a recording of Bach pieces done on synthesiser. This album was hugely popular, made her famous and made a lot of money. She used some of the proceeds of the album to fund her transition, which she kept secret for nearly a decade- dressing up as a man when she appeared publicly because she feared discrimination. Fortunately, when she finally did disclose in 1979, nothing much bad came of it, but it must have been miserable to spend so many years in (reasonable) fear of a backlash.

The popularity of her work shows a strong popular appetite for new timbres, but in a familiar context, like Bach. We’re going to listen to a piece by her …

When you’re talking about a member of any minority group, it’s best to assume that at least one of your students in a member of that community. the intent is to be respectful and to make that student feel included, while at the same time giving other students the idea that members of this minority groups belong in their field. Never be neutral about discrimination.

It’s impossible to get this right every time. Sometimes talking too much about discrimination can traumatise the students who also experience it, or glossing over it can fail to condemn it forcefully enough. The important thing is to keep trying to include this and to get a feel for the students you’re teaching, as every group and every institution will be different. You may find, for example, that student comments about works by women tend to be more negative than works by men. One way you might address this is to present the works first and ask for comments and only talk about biographies afterwards.

Keep trying things out. We can make a positive difference in our teaching, no matter what our subject it.