Getting Started with SPEAR

Sinusoidal Partial Editing Analysis and Resynthesis is a zero-cost program for Macs and Windows. It works with the latest Macintosh system update.

It is a program that does FFTs of audio files to display a spectrum which you can then edit. It’s not as fully-featured as AudioSculpt, but it’s compatible with your new Mac and the price is right.

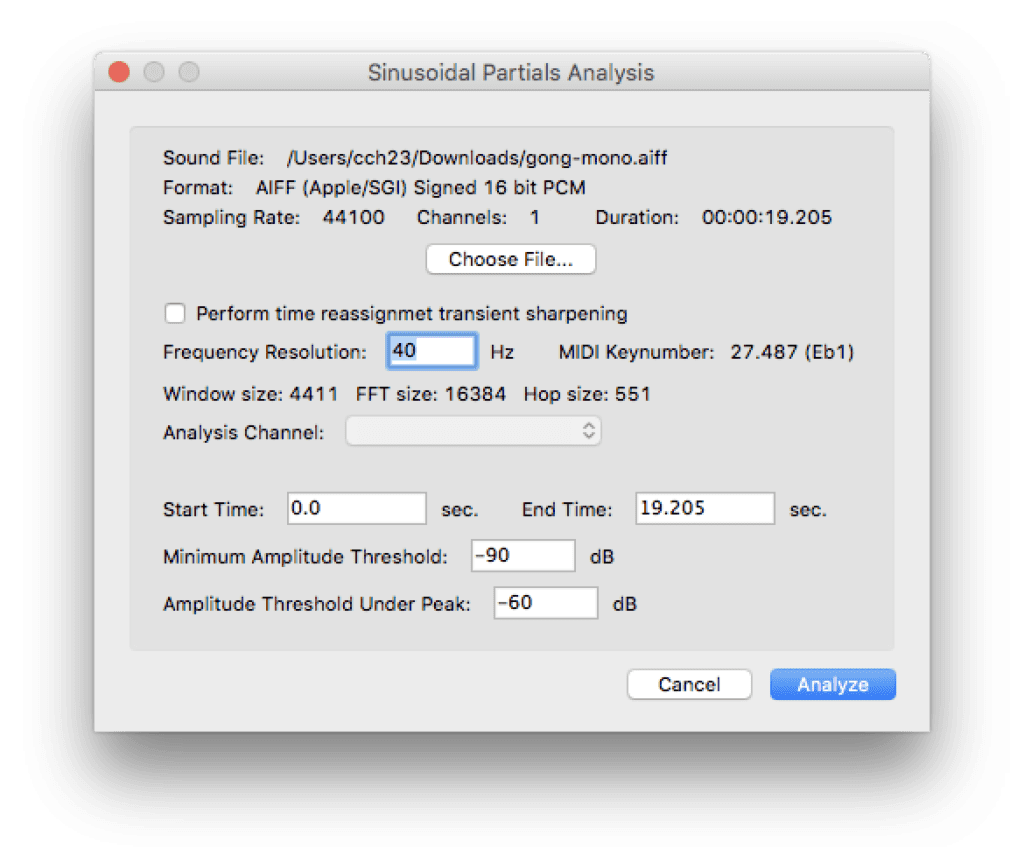
When you open a file, it starts by asking you a few questions.

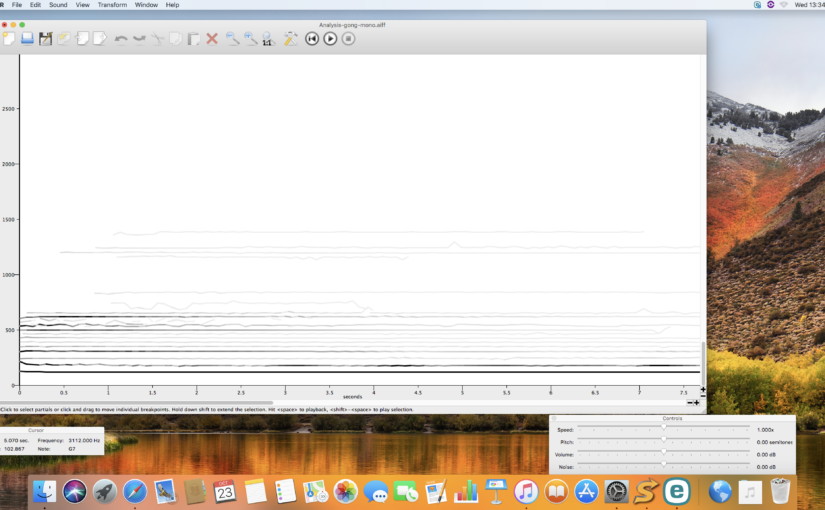
Sinusoidal Partials Analysis window

One of the things it asks is the bin spacing for the FFT. This should be narrower for low pitched sounds and can be wider for higher sounds. If you have a stereo file, it asks which channel you want to process. It works best with mono, so if you have a stereo file, you may wish to mix it down to mono or to process the left and right separately.

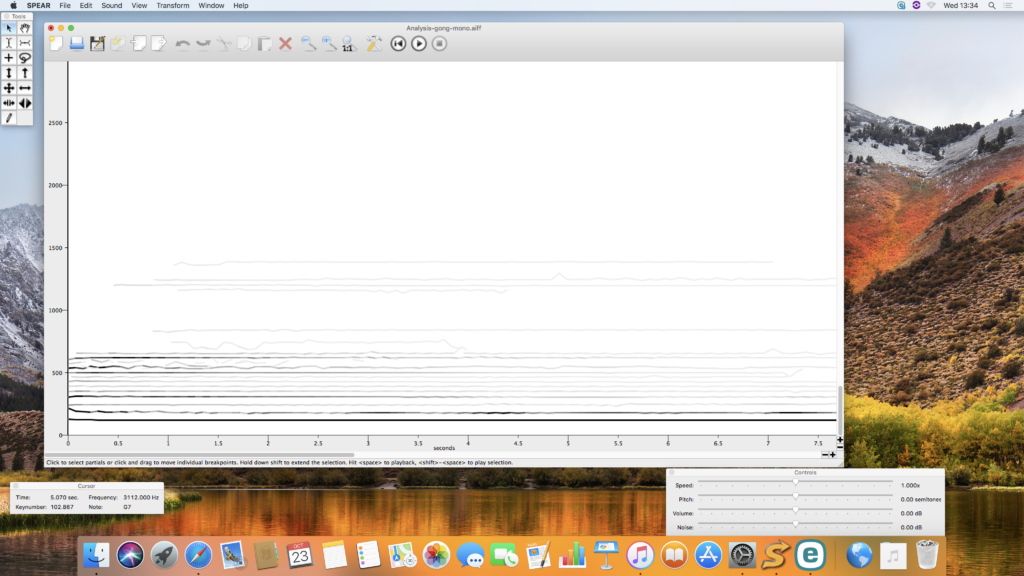
Constituent frequencies of a given sound, if they’re loud enough to be important, are called partials. All of the lines in the big window represent partials. Ones towards the bottom are lower in pitch and ones above are higher. Time moves from left to right. The darker partials are louder.

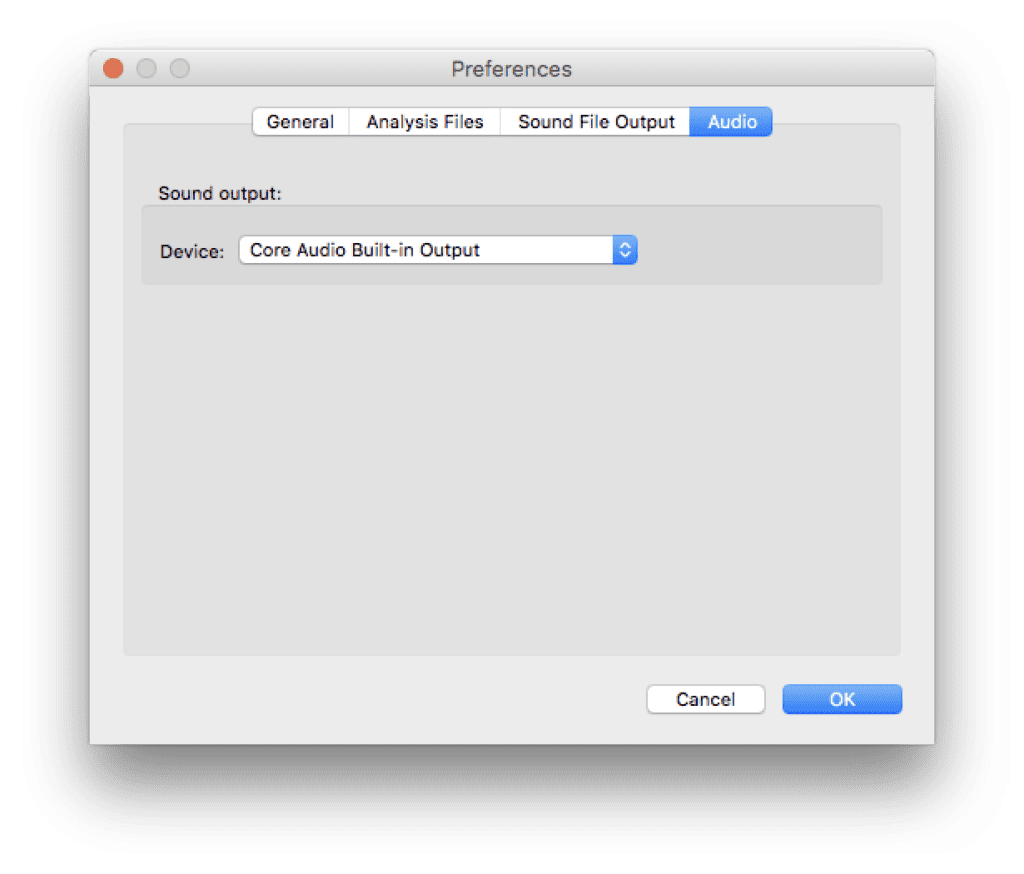
If you want to hear the sound, press space bar. If you don’t hear anything check the preferences and make sure audio is going to to correct output.

The preferences window showing the audio pane, with Core Audio Built-in Output selected.

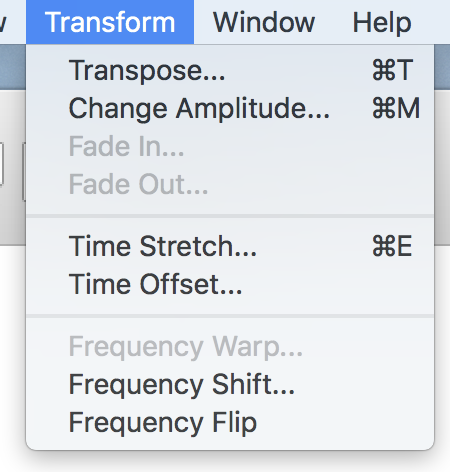
The transform menu contains a several things you can do to the sound. If no partials are selected, these will apply to every partial. Otherwise, they apply to only the ones which are selected.

The Transform menu

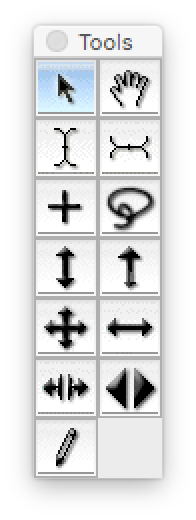
To select a single partial, pick the arrow in the tools menu, and then click on the partial. To select a rectangular area, pick the plus sign, to select a free area, pick the lasso. You can shift click or shift select to grow a selection area. Also see the edit menu for options like inverting your selection.

The tools window

When you hover over an item in the tools menu, the name of the item appears. These items include time stretching, moving, shifting, transposing and drawing in new partials. You can use the time stretch tool to just stretch selected partials in one part of the file.

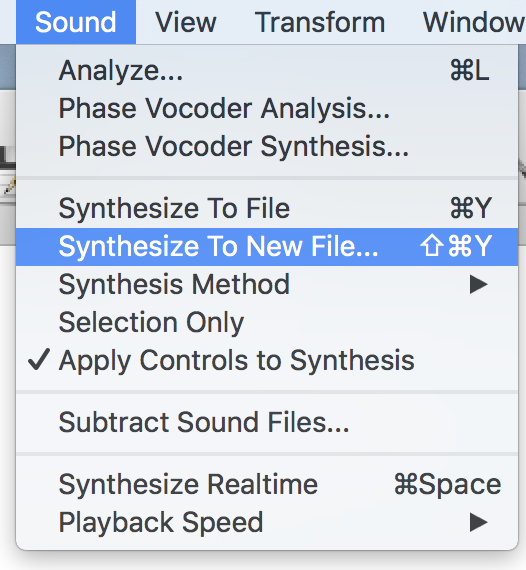
You can save files, which are the analysis files that SPEAR has created and which you’ve modified. You can also save a rendering as an audio file. There are a few choices with this. You can do an additive re-synthesis using a bunch of sine waves or an IFFT. If unsure, experiment to see what sounds best with the particular file you’re editing.

The Sound menu

There is no manual for SPEAR, but there is a single webpage with some explanations. Or there are some technical papers you can fine on the program’s website.

This program has been written with GTK portability in mind, but I could not find a link to source code and no linux binaries seem to be available. I have written to the author to ask if he intends to make this a FLOSS project, as it seems like a really good fit for the Ubuntu Studio distribution. I’ll update if I hear back. Sending an email like this, is, of course, asking a favour, so I’m a bit worried that he might get this question a lot. In any case, releasing a mac compatibility update was definitely a public good.

The Free CD for Mac

I just gave a talk about FOSS and music and gave out copies of the Fossbox free software CD for mac. Here is the readme file that came with it, with download links. You can also find a bunch of cool free mac software from the website http://www.opensourcemac.org/

Welcome to the Fossbox Free CD


The free CD gives you a taster of the free
software options available for the Mac. In this document, you’ll find
a brief description of the software and links to instructions for
installing it. You can find free
tutorials and books to help you get the best from the software
on
the Fossbox website.

Office and project software


Open
Office
is a free alternative to MS Office. It’s very similar and
most people are able to get started and carry on as usual without any
special training to use it. It has a word processor, a spreadsheet,
presentation and data-base with wizards. Download it here.To get you started
using
Open Office you’ll find tutorials here
and some
flash tutorials here
.

If you find Open
Office to be too slow, Neo
Office
is a mac-specific version of it that has fewer features
but quite a bit more speed. You can download
it here
.

Skim
is a PDF viewer that allows you to modify and annotate PDF files, for
example, by filling in forms. Download it here.

Scribus
is a free Desktop Publisher. Download it here. You’ll
find free
Scribus video tutorials here

Internet


Thunderbird
is a free email programme
. Download it here. and
follow the on-screen instructions. To get started using Thunderbird
you will find illustrated
tutorials here
.

If you would like a
calendar, this can be added to Thunderbird. Follow
these illustrated instructions to add a calendar
.

Browsing the internet


Although the Safari browser is included with OS X,
there’s an alternative browser called Firefox. Download it here.. It
has more features and is more customisable.

Website editor


To help you make simple websites, Kompozer
is a visual HTML editor with formatting buttons. Download it here.You’ll find free
Kompozer tutorials here

These tutorials are for a previous version of
Kompozer called NVU but Kompozer is almost identical so you should be
able to get started:
http://www.designyourownweb.com/nvu/settingup-nvu.htm

To upload website files to the internet, you need
an FTP client so check out Filezilla. You can download it here.. (In order to install it, you
may need to first install The Unarchiver utility. Click the link to download it.)
Your ISP will be able to
give you the login information you need to set up FileZilla – ask
the people you rent your website space from.

Instant Messaging


Audium
allows you to connect to multiple IM accounts, including Facebook, in
a single app. Download it here.

File Sharing


Transmission
is a Bit Torrent client. Download it here..

Graphics


There are two graphics programmes included on the
CD.

If you want to do serious photo-editing, you need
the GIMP, a
fully-featured graphics programme
. Download
it here
. Gimp on OS X requires X Windows, which is included with
your system CD or a free version can be downloaded
here
. Free
GIMP tutorials here

Inkscape
is vector drawing software., which also requires X Windows. Download it here. You’ll
find tutorials
for Inkscape here

Note
that Open Office also
has a vector drawing application.

Media


Multi-media player
VLC
is
a light and versatile movie player which opens more types of movies
than Quicktime. Download it here.


Ripping DVDs
HandBrake
is a DVD ripper. Download it here.


Video Editing
Processing
is an open source programming language environment for people who
want to program images, animation and interactions. Download it here..

Sound


Editor
Audacity
is a light-weight sound editor. There is a stable version and a beta version. The beta has more and better features, but you will need to save early and often. If that worries you, get the stable version instead. Download the stable version here. or Download the beta version here.


Ardour
is a a fully-featured Digital Audio Workstation with plug-in support
that can be used for serious audio projects. You can download it here. They will ask you if you want to donate to the project. You can put whatever amount you wish in the box, including $0.
Ardour
relies on a helper application called Jack,
which is also useful in it’s own right. Download
Jack here
.


Programming
Pd
is a real-time graphical dataflow programming environment for audio,
video and graphical processing. It is especially useful for rapid
prototyping and can be used to write reactive music or the iPhone via
the RjDj app.
Download PD here.


SuperCollider
is an environment and programming language for real time audio
synthesis and algorithmic composition. It has a bit of a learning
curve, however, it is extremely
powerful and useful. Download
it here
.

OS X Network

I have two macs. One is a laptop and one is a mini. The mini has not mouse, monitor or keyboard. I control it with VNC. This works out great 95%-99% of the time. Except for last week when it didn’t. I told the Apple Updater to do some install it wanted to do and the computer didn’t come back on the network. I hooked up the computer to a video projector and discovered that it wasn’t booting. The round sunburtsy thing it does during startup was just going and going and going.
I borrowed a mouse and keyboard and re-installed the OS from a 10.5 disk and then re-enabled Remote Management and then installed all the updates, etc and it works now. What a pain, though.
And, also, there’s a slight difference. On my laptop, finder windows have a left-most column which list the drives on my computer under “devices” and “places” and “search.” There’s also a section called shared and it shows my Mac Mini. If I click on that, I get a big icon of the disk and two buttons. One says “Disconnect” and the other says “Share Screen.” Below those are a list of shared directories and drives. Before my computer had it’s troubles it listed the external firewire drive in the list. Now it does not, but still has the internal drive, my home directory and shared folders on the internal drive.
I’ve gotten addicted to doing network file transfers via drag and drop, and now I can’t get to my data disk? I have no idea where one would configure it to show up. It was not a shared disk, I just had access to it because I was logged in as me. Why has it gone away? How do I get it back? Woe is me! What search terms do I type into the help menu? I’m stuck!

Edit

According to some help file someplace, since I’m connected as an admin user, I should have access to the entire computer. Bugger it.

Ardour Report

I have advice. I spent some time with the native version of ardour yesterday, and, of course, a lot of time previous to that with the X11 version. If I were on OS X 10.4, I would run the X11 version because it’s very reliable and it’s pretty easy to install. The only drawback is that you have to first install X11, but that’s worth doing anyway.
On Intel 10.5, I’m going to run the native version. While using it, I encountered a crash bug, (which I reported). It crashed very reliably, but, unlike Audacity, crashes do not result in the loss of saved data. The way I work with audio software is that whenever I make a change to a project, I save. Record audio. Save. Adjust panning. Save. To use the native version of Ardour, you must work this way, but you should be working this way anyway. Save early and often!
(I’ve worked in higher education as a lab assistant and I can’t tell you how many times I’ve comforted weeping students who’ve just lost hours of work. Every program crashes occasionally. My sad students were all using commercial software and lost their data. Save. And backup!)

Getting Started

First do all the configuration and whatnot in my previous post. Then

  1. Start Jack Pilot
  2. Click it’s start button
  3. Start Ardour

That’s either version, native or X11. (The other issue I encountered with Ardour is that I keep forgetting to turn on Jack. This is not a big deal, as the friendly GUI will altert you and you can go do it. I’m forgetful enough that I created an Automator script to do it for me. If there is demand, I will distribute some version of the script.) After you start it, Ardour will open a dialog box in which it asks you to eiahter make a new session or open a previous one. Then, a large window opens which should look familiar to you if you’ve used other audio software before.

A Wee Bit More Configuration

Go to the Options menu, then go to Autoconnect. Put a checkmark next to “Auto-connect inputs to physical inputs”. Then, again in Autoconnect, put a checkmark next to “Auto-connect outputs to physical outputs”. Finally, still in the Options menu, go to Monitoring and select “Software Monitoring”.
These options are what I think most users will need. If you have fancy hardware or whatever, you may need to do something different.

Why I Recommend Ardour

  • Quality of product – Ok, the version I’m using has a crash bug, which sucks, but it’s beta. However, this is software does everything I need it to do and does so well. It might crash occasionally, but it doesn’t glitch. And let’s face it, protools has bugs too (what version is it where sometimes, inexplicably, it wouldn’t bounce to disk?). Ardour’s bugs are less annoying than the bugs I’ve faced with protools. And the developers tend to respond to bug reports.
  • Economic – This is a fully-featured audio workstation and it’s free. The developers would like it if you donate, but if you’re an impoverished student and you can’t, that’s ok. And if you’re an impoverished non-profit/NGO and you can’t, that’s ok. Or if you’re just impovershed and you can’t, that’s ok. Sliding-scale software means access for everybody. (The corollary is that if you’re not impoverished, you should make a donation.)
  • Support – Help is always available via IRC or the forums on the Ardour website. Also, unlike certain other software companies (grr), the developers of Ardour aren’t going to suddenly drop support for you to force you to purchase an upgrade.

Blogged with Flock

Audio software on 10.5 / Intel

Audacity

I’ve been starting to try to record things on my new mac, despite feeling cruddy with a bad cold. I first started out with trying to use the beta version of Audacity. It acted much more like an alpha version. After the 4th crash in which all my data was lost, I took a look back at the non-beta version of Audacity. This seems to be stable and work well. However, it just doesn’t have enough features to use it for composing. It’s great for recording a vocal-only podcast or running FX on pre-existing audio, but it’s not going to cut it for my needs now. So I turned to Ardour.

Ardour

Ardour does just about everything I need. It’s a competitor to Protools and Digital Performer. And it’s free!! W00t. In the past, I only ever used this on my macmini because I had a disk space shortage on my old laptop. I was less worried about the program itself and more concerned about having space for y projects. Audio files can take up a lot of space.
It has some system requirements. If you’re on 10.4, you will need to install x-windows, if you don’t already have it, which means you need to go dig out your system disk. If you’re on 10.5, you will have other issues. It requires a helper application called Jack.

Jack

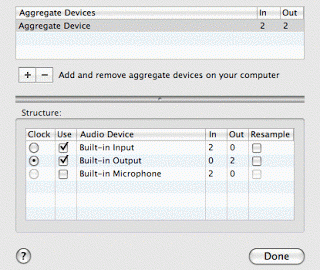
Jack is awesome. If you’re on intel, once you install it, you will need to open /Applications/Utilities/Audio MIDI Setup. Under the Audio menu, open the Aggregate Device Editor.
Aggregate Device Editor

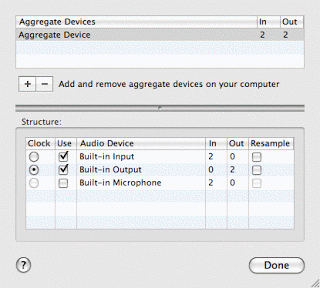
At the top part, you can create aggregate devices and give them names. In the bottom part, you can see the actual audio devices on your computer, with check boxes next to them. Check the ones that you want to use.
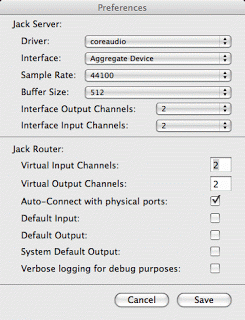
Then, you need to configure jack. Fire up JackPilot. You need to tell the preferences to use your aggregate device.

JackPilot Preferences

Patching the X version

10.4 is now ready to go, but 10.5 has some changes in how X windows is handled. You have two options on running Ardour. One is to run a patch. The development team has already figured out how to solve this problem, but they’re short staffed or something and haven’t updated the version or download. Ergo, you need to apply some small changes to the program by typing a few things at the prompt. This is easy enough, but if you don’t like prompts, skip to the alternate solution.
The terminal application is located at /Applications/Utilities/Terminal. Open it up. Between you and me, the terminal is awesome. It gives you all kinds of power over your computer. In a future post, I’ll link to a cool manual, but I can’t find it right now, alas. Anyway. Here’s what you do:

  1. Select the following text and copy it (by going to Copy under the Edit Menu or typing apple-C)
    Index: script
    ===================================================================
    --- script      (revision 2354)
    +++ script      (working copy)
    @@ -32,17 +32,22 @@
         sed 's/xterm/# xterm/' /usr/X11R6/lib/X11/xinit/xinitrc >> ~/.xinitrc
     fi
     
    -mkdir -p $TMP
    -cp -f "$CWD/bin/getdisplay.sh" $TMP
    -rm -f $TMP/display
    -open-x11 $TMP/getdisplay.sh || 
    -open -a XDarwin $TMP/getdisplay.sh || 
    -echo ":0" > $TMP/display
    +if uname -r | grep -sq '^9' ; then
    +    # leopard will auto-start X11 for us
    +    :
    +else 
    +    mkdir -p $TMP
    +    cp -f "$CWD/bin/getdisplay.sh" $TMP
    +    rm -f $TMP/display
    +    open-x11 $TMP/getdisplay.sh || 
    +       open -a XDarwin $TMP/getdisplay.sh || 
    +       echo ":0" > $TMP/display
     
    -while [ "$?" == "0" -a ! -f $TMP/display ]; do sleep 1; done
    -export "DISPLAY=`cat $TMP/display`"
    +    while [ "$?" == "0" -a ! -f $TMP/display ]; do sleep 1; done
    +    export "DISPLAY=`cat $TMP/display`"
     
    -ps -wx -ocommand | grep -e '[X]11' > /dev/null || exit 11
    +    ps -wx -ocommand | grep -e '[X]11' > /dev/null || exit 11
    +fi
     
     cd ~/
     shift
    
    
  2. Ok, now be relaxed. If you don’t want to know more about what that code is doing, you don’t have to. Go to your terminal and in the window there, type:
    cd; cat > ardpatch
  3. Now, still in your terminal window, paste in all the code from the clip board, by selecting paste in the edit menu or typing apple-v
  4. Still in the terminal window, type ctrl-d. What you did just then was change to your home directory (with “cd”) and then put the code into a file called “ardpatch” (with the cat > ardpatch). And then closed that file by typing ctrl-d.
  5. Ok, now you need to know the directory where you put Ardour. If you put it in /Applications, then you’re going to type:
    cd /Applications/Ardour2.app/Contents/Resources/

    but if you put it in a folder in /Applications called Audio, then what you’ll need to type is:

    cd /Applications/Audio/Ardour2.app/Contents/Resources/

    cd is changing directory and you need it to change to a hidden directory inside Ardour, so the first part is the location where you stuck the program.

  6. Then type:
    patch -p0 < ~/ardpatch

    It will tell you strange things and possibly give you an error. Ignore all that. Instead, start jack with JackPilot and then click on the Ardour2 icon to start the program. It should start up, but for me, this took several minutes, I think just because it was the first time.

You only have to apply the patch once, so you're good to go from now on. Or you can try a riskier but easier route.

Native Version

Beta software is always fun, isn't it? You can try running the native version instead. It's beta. It could crash terribly. I haven't tested it much, so I can't recommend it or warn you away or do anythng else aside from tell you it's semi-secret location.
Well, it's more an open secret. I got it from the IRC channel on freenode. If you need help, that's a good place to go, by the way. (Is IRC undergoing a renaissance or is it just me?)
The native version is at http://ardour.org/files/releases/Ardour2.2-Intel-2920.zip
It's probably a secret for a reason. I'll give it a try this afternoon and let y'all know what I think.
The native version still requires Jack. You will still need to do all the Jack configuration listed near the top.

Conclusion

The nice thing about configurations is that you usually only need to do them once. Given the amount of awesomeness crammed into Ardour, it's totally worth the bother.

Crypto Howto

Last night, I posted my PGP key with no context whatsoever. Some of you probably didn’t quite grok it. So here is an explanation of what it is and how to use it. This is specifically written for OS X users, but the concepts can apply more generally.

What is PGP

PGP stands for “Pretty Good Privacy.” But it’s more than pretty good, it’s very very strong encryption. This means that you can send email to somebody such that only that person can read it. You do not have to meet ahead of time and arrange secret passwords or secret knocks. No “the crow flies at midnight” required.
Or rather, there IS a “the crow flies at midnight” required but anybody and everybody knows it. This is something called a public key. You want to shout your public key from the rooftops. Anybody that wants to send you a secret message has to know it. But the public key is only half the story. You also have a private key which you keep secret.
Your buddy in the Animal Liberation Front wants to send you some secret email. Zie uses your public key to encrypt the email. This transforms hir message into a bunch of gobbledygook. Zie sends you the gobbledygook. Nobody can figure out what the secret message is – except for you! Your private key (and ONLY your private key) can descramble the message.
Your public and private keys go together. One scrambles. The other descrambles. They are a key pair and work together.
The main point: you can send secret messages to people that ONLY they will be able to read.
You can also use PGP to sign messages, which is something that we’ll get to at the end.

Why would you want to send secret messages?

Email goes through the internet like a postcard goes through physical mail. Your text is not at all hidden. The postal carrier can easily read what you’ve written. Do you use gmail? You know how the ads on the side are related to your email contents? It’s because they’re peeking at your mail to figure out what ads to show you. (They promise that no human ever peeks, it’s just an ad-making engine.)
Just like with a postcard, any computer sitting between your computer and the recipient can read your email. For Americans, under the Patriot Act, various government agencies can demand that your ISP hand over your email and never even tell you it happened. I’m sure you’re not planning any nefarious deeds, but recall that police have been infiltrating the sort of peace groups that gather and hold candles. If you’ve ever gone to an anti-war march or just have a similar name to somebody who has, it’s possible that your email is being intercepted. To put this another way: you know all those stories of woe surrounding the idiotic “no fly list”? Well, the same thing is probably going on with email, except since nobody tells you, you never know. Recall that the big telephone building in the Mission District of San Francisco has a bunch of federal spy equipment in the basement. Reading emails going into and out of the Bay Area.
Maybe you’ve got a really unique non-activist name and are completely apolitical. What have you got to hide? Except that steamy extra-marital affair!

Wait! Can’t terrorists and kiddie porn people also use these tools??!

Yep. Having opaque walls of your house ensures that nobody can see you when you’re sitting on the toilet, but it also means nobody can see you when you murder cute puppies. I’m still in favor of having opaque walls.

Getting Software

As if things weren’t confusing enough, the current version of PGP is called GPG. (The ‘G’ stands for GNU, not that it matters.) It does not come standard with OS X, but can be downloaded from: http://macgpg.sourceforge.net/
You will want to download several of the programs on that page. Scroll down some and then grab: GNU Privacy Guard. (Get the version that matches your operating system version (to find that out, go to the apple icon in the very top left hand corner of your screen. Click on it, then click on “About This Mac”. A window will open with a picture of an apple and the words “Mac OS X”. Below that is the version.))
Also grab: GPG Keychain Access, GPGFileTool, GPGDropThing and anything else that looks interesting.

Making Keys

After you download and install the tools, you need to create a key pair. Recall that a key pair means a public key and the private key that goes with it. One encrypts. The other decrypts. As you can probably guess, there’s some tricky math involved (it has something to do with the products of large prime numbers and is really cool, but this is the last you’ll hear of it in this post, alas). Fortunately, the software handles all of this for you.
Start up the GPG Keychain Access program. As you can guess from the name, this program keeps track of keys for you. Not only your keys, but the public keys of your friends, co-revolutionaries and secret lovers.
Under the Key menu, click “Generate”. A helpful dialog will pop up. The default values are all fine. When it asks for your name, give a name known to people who want to send you email. And for email address, obviously, you want an address also known to those people. For comment, give some info that will separate you from all the other Sarah Jane Smiths on the internet like “traveler in space and time” or “investigative reporter” or something that actually applies to you that will help your friends and co-conspirators recognize you.
Eventually, it will ask you for a password. This will be the password for your keychain. Recall that your private key has to remain secret. This secrecy requires the boring, old-fashioned, password-based security, like the combination lock on your gym locker. All the normal suggestions for picking passwords apply.
And finally, it makes your key pair. Which takes a while because of the tricky math. Go make a cup of tea or walk your dog while this part goes.

Sharing Keys

Posting your key to your blog is, alas, not the best way to share keys. Instead, there are computers called keyservers. These computers sit on the internet and do nothing but keep track of people’s public keys. They are good places to put your public keys and also a good place to find the public keys of other people.
Your new key is now listed in the Keychains window of the GPG Keychain Access program. Click on it so that it’s highlighted. Then, under the Key menu, select, “Send to Keyserver.”
Oh my gods, weird windows popping open! The terminal! Ack! Yeah, just close all of them. The program is kind of ugly and messy, but it does it’s job. Your key is now out on the internet where folks can find it.

Finding Keys

I can hear your inner monologue now, “Whee! This is fun! What next? Secret email! Oh, but who do I send it to?” Well, you could send some to me! But first, you need to find my key. Go back to the “Key” menu on your Keychain Access application and select “search for key.” Type in my name, “Celeste Hutchins”
More windows pop open, but this time you have to pay attention to them. The terminal window will give you a numbered list of all the people named “Celeste Hutchins” who have submitted keys. Which one is me? Well, make your best guess and type in the number next to it. It should then go into your key menu in the keychain application.
How do you know it’s really me and not some evil miscreant pretending to be me? Well, that’s a problem. And for that reason, you need to tell the keychain manager how much you believe that the keys actually go with the person that you think they go with.
Highlight my key. Under the Key menu, select “Edit.” Again, a terminal window opens. It waits for you to type a command. Type “trust” (without the double quotes) and then hit return. It then asks you about your trust level. It gives you a rating from 1 – 5, where 1 is “none” and 5 is “all the way.” this trust level is not about how much you trust me (or the person whose key you are editing). It’s how much you trust that they actually belong to who you think it belongs to. Do you trust that it’s really my key? Well, alas, there are some features that won’t work unless you select 5. So if you want to try sending me encrypted email, you’re going to have to pick 5. Type “5” (without the double quotes) and then hit return. Then type “quit” (without the double quotes) and hit return. Now you can close the window.

Encrypt Something

Yay, now the fun part! Open the program GPGDrop Thing. A strange-looking window opens. Type something in that window. Specifically, type your secret message! When you’re done creating your secret message, go to the GPG window and select “encrypt.” You get to pick the recipient from a drop down list. In that list, you will see your own email and the email addresses of everybody that you trust ultimately. Pick your recipient and then click ok. Your message will turn into gobbledygook. Now select the whole contents of the window, copy it and paste it into your gmail account (or other mail program). Send it. Only the recipient can descramble it.

Decrypt something

You just sent me encrypted email. I wrote back with an encrypted message. It looks like:

-----BEGIN PGP MESSAGE-----
Version: GnuPG v1.4.7 (Darwin)

hQEOAwGSD30Hb8lOEAP/RmZP0J11auooLc/VGT13VDD1U+r2MhD3mivHOlK3pn8u
8gnSiHSvVTqX1xSRqWoyFKN9o+7oJMCOTLqzPxin+lzzejIPNJYQ8jIWASxHXSPS
2bAl+dVHywXs3FQH2ZgPa4Hn7hDfi5fR/cdmNdp0QTOz8JUEf8pfS8upkvGYQ1UE
AKhYTl455pEV2WU5+E4/LH0qifQWgRnmmS7J6UAow/u45GakeC2athUpF3K8l1uM
PnvLK41KRUhQPS+VkbK5CgPlR+EGTmZgxqE4fTe+oBSPB/M3DSNiCBHux/auAIOM
6QvvjCyw8G+Dejx9IGIVrky8En5rKAvdOwWfU9YApWhF0mMBEwEnVdbjuLoh+en1
e93Hfc3UabK7gGcx3xE+fJHtDnghYdamAKk0sR5kp7dBAtcENiNYmYlgD5p9hhvz
F8t3X0K/e8NREERDx814RL3AzhjJmcvTJEn27NXQ/lFOpH5AlDY=
=CNU6
-----END PGP MESSAGE-----

What does it say?! Copy and paste it into GPGDrop thing. Get everything between and including the “—–BEGIN PGP MESSAGE—–” and “—–END PGP MESSAGE—–“. Go to the GPG menu. Click “decrypt”. Now you can read your secret message!

Sign Messages

Sometimes encrypting messages is overkill. you don’t need to bother encrypting it, but you’d like to make certain that it hasn’t been changed mid-route. Maybe you’re sending email internationally and part of it got censored, just like an over-zealous postal carrier might strike out naughty words on a postcard. You can sign a message, thus showing whether or not it has changed en route.
This puts some text around the message like this:

-----BEGIN PGP SIGNED MESSAGE-----
Hash: SHA1

This is a signed paragraph.
-----BEGIN PGP SIGNATURE-----
Version: GnuPG v1.4.7 (Darwin)

iD8DBQFGoMDraT4BrLUNqWkRApd1AJ4xqy9KtjGdG1du6U+UKCrS3V0S3gCgoSdG
Ehf8fbykxxhJEGiq2bcZgRg=
=MKke
-----END PGP SIGNATURE-----

The main text is “This is a signed paragraph.” The rest is the signature. It verifies that the text that you received is the same as the text that I sent. PGP uses my text and my private key to generate the signature. The text and the key put together form a unique string of gobbledygook. You can verify that they match by cutting and pasting the whole thing into GPGDrop Thing. Under the GPG menu, click verify. If it verifies ok, the message is as I sent it. If does not, it means that my text has been changed.

Going further

If you use the Thunderbird mail client, you can install some PGP plugins to handle all of this for you. There are also scripts that exist for firefox. You will have to look these up on your own. Have fun!

Confused?

Please leave comments if you are confused or have ideas about how this can be improved. Is it clear enough for people who are not power users, but just surf the web and check their email?
HOWTO: Flash your N800 with a Mac

Basically, follow the instructions here,
especially the part about the backups and where to download the flasher (the 770 flasher for OS X works with the 800 too) and where to download the image to flash.

However, there is one crucial step not mentioned on that page. After you do your backup and download the flasher and the image, you need to unplug your tablet from the wall and from the computer and turn it off. Take out the SD card. Then, run the flasher. When the flasher says it’s waiting, plug in the device to the USB. Hold down the home key (the one on the front with the poorly drawn house on it) while pressing the power button. Make a note of holding down the home key, because it’s rarely mentioned in documentation.
For some reason, I had to try running the flasher app more than once. The first time, it had a USB error. The second time, I tried to run it with the tablet already in the ready-to-flash state. I would have turned the tablet back off to try all this, but it doesn’t seem to want to turn off before flashing when it’s in that state. I don’t know what happens if you have it like that and can’t get the flasher to work. Does it return to normal if you pop out the battery?
After the flash is complete, turn the device off, pop the SD card back in. With mine, it asked me for some date and time and the restore application popped right open. I restored everything, regardless of date. The utility does not backup software and everything on the device is wiped, so I’ll have to re-download everything. Alas.
Reviews of how well it works post-upgrade will be forthcoming.

Hot Power Brick

Lately, I’ve been noticing the smell of hot plastic, whenever I’m on my laptop. Just now, I tracked it down to the power brick. It’s the Apple one that came with my laptop when I purchased it in North america. Now, I’m using it in Europe. I thought these things could deal with international electricity differences without problem? Should I get a step down converter? Could it be something about the particular power outlet that it’s been plugged in to? What in it could break to cause this change, but still allow it to deliver power? Could it just be the unusual way in which the cable was coiled around it? If I do nothing, will it catch fire, resulting in massive data loss and the death of my sousaphone? Is it possessed by demons? Can this kind of problem arise from being stuffed into a messenger bag and bouncing around on the front of a small bicycle bounding over cobblestones?

This situation is suboptimal, but at least I found it before it burned a hole in a sofa cushion.

Update

computer store dude says to keep using the adaptor until it dies a natural death. I think I’ll keep it more on the floor and less on the sofa, and not leave it plugged in when I’m not around to look at it.

Jacked

Yeah, so I can get Ardour to display on a remote machine, but forget about making sounds thus displayed. Run it in VNC and it’s fine. Run with ssh X tunneling, and there are problems. What kind of problems, you ask?

allocate_mach_clientport: can't find mach server port
Can't allocate mach port

For the longest time, I thought that error was originating within Ardour. So I downloaded the source. Man, you need a ton of libraries to compile it, several of which are either in Fink’s unstable tree or not present within fink at all. Ardour developers use Darwin Ports, I guess. Anyway, the fink version of jack absolutely does not work for me. So I was giving up on the project, when I looking at console logs revealed that the problem seemed to be coming from Jack.

Maybe if I could just discover the name of the jack sever, there exists an undocumented command line argument to pass to Ardour to tell it which server to use! Fortunately, there exists a utility for just such discovery: jack_lsp. So after learning of it’s existence, I typed in the command and got:

allocate_mach_clientport: can't find mach server port
Can't allocate mach port
jack_client_open() failed, status = 0x  

aha! So I downloaded the JackOSX code and it was a terrible mess. So I downloaded the Jackit code, but it doesn’t play well with core audio. There’s some goofy thing on mactel computers such that you have to create an aggregate device or else in and outs are treated differently. There’s probably a command line argument to fix this, but I like the nice JackOSC GUI, so I went back to their messy, messy code and started banging away at the core audio driver, since that seemed like a possible culprit.
Several hours later, after learning about some macros in C that I’d never heard of and borrowing some code form JackIt and otherwise swearing, I got a new library for coreaudio to build and link. Hooray. That was way too much effort. And I fired up the JackOSC GUI and everything worked. Yay!
And then I typed jack_lsp and got the same error again. grrrr. The code for jack_lsp is not in the Jack OSX source repository, as far as I can tell. It is included with JackIt, but it’s clearly not the problem. The problem is some Jack library that they ship out as a binary. Perhaps using my special sekrit powers, I can build the JackIT kit to use my core audio library, since it’s got a bunch of jackit code in there now anyway. Or maybe I can give up and just use VNC.
Anyway, this is why I haven’t written any music the last few days, nor implemented a very, very fast pitch tracker that just uses the samples around zero crossings.
In other news, the weird mole on my back was not cancer. Wonder why it itched so much.

Securely Using a Macmini as a remote controlled audio workstation (or media center)

Let’s say you have a mac mini and a laptop and you’re too cheap and/or lazy to buy a screen, keyboard and mouse. You don’t need to! The answer lies with your laptop. It is possible to control a macmini (or any other type of mac) with another computer of nearly any variety. I happen to use a mac, but it is also possible with windows and linux.

VNC

To start off, you will need to borrow some peripherals, so you can do the initial setup. After you register and whatnot, You will want to setup VNC. This allows you access to the minimac’s desktop from your laptop. Open the minimac’s system preferences. Open sharing. Click the “Services” tab. Click the checkbox next to Apple Remote Desktop. After that, you want to set Access Privileges. This should open automatically the first time you turn remote desktop on, but if it doesn’t, click the “Access Privileges…” button.
On the left, you will see a list of users. Select yourself. On the right, you see a list of actions. If you want to allow remote control (which you do), select all of them. Below the line, there is a checkbox which says “VNC viewers may control screen with password:” Check that box and then give it a secure password. Click “ok”
You are back on the sharing – Services window. Check the box next to “Remote Login”. Ok, now click on the firewall tab to make sure your firewall is on. While you’re there, also give your computer a name that’s different from your laptop’s name then quit the user prefs.
Ok, now go to your laptop and get a VNC client. If your laptop is a mac, Chicken of the VNC is perhaps the most popular. It’s what I use. If you’re on another kind of computer, just search the internets to find a VNC client. Download and install to your laptop.

SSH Tunnelling

Ok, now it’s time to test this out. First, open a terminal on your laptop (/Applications/Utilities/Terminal.app). Then type:

sudo ssh -X username@macmini.local -L 5900/127.0.0.1/5900

(Use your username and the mane of your macmini.) It will prompt you for a password (and may quote Spiderman at you.). Type the password for your account on your laptop. (It may ask you if you’re sure you want to connect, etc. Yes, you’re sure.) Then it will ask you for a password again. Type the password for the account on your macmini. You should see a unix-type prompt. Hooray, you are logged into your macmini.
You are logged in securely, which is even better. Don’t dispair, the graphical connection is coming next, but first an optional, brief explanation of the command you just typed: Ssh is a secure way to connect with another computer. In this case, it’s also doing something called port mapping. This makes a secure connection between a port on your computer and a post on a remote computer. If you connect to that port on your local computer, it will actually, really form a secure connection with the remote port. What this means for you is that nobody can eavesdrop over your connection (an issue if you’re wireless). The reason you type sudo is because you need root privileges to tunnel on important ports.

Back to instructions

Ok, open Chicken of the VNC on your laptop. A login window will open and there will be a list of servers, hopefully with your macmini on the list. However, you are not going to click on it. Instead, click on the + button in the lower left. A new server name will come up. Type in something like “secure minimac”. On the right hand side, type in your password. Don’t change any of the other info. You want it to connect to localhost on the default port. You can tell it to remember the password if you feel like your laptop is not going to be “borrowed” by non-trusted people. Don’t click any other checkboxes. Click connect.
A window should open with a view of the screen of your minimac. If this doesn’t happen, try the following:

  1. Do you see the name of your mac in the list of servers? If not, make sure that you’ve turned on Apple Remote desktop on your minimac.
  2. Can you connect to the remote server directly, not via the secure connection? If so, you’ve got weird problems and will need to ask for help from somebody else, like your network administrator.
  3. If you cannot connect at all, the problem may be a firewall. Make sure that the firewall on your LAN allows connections on port 5900. You may need to talk with your network administrator.

Now that you have a window open onto the remote computer, try doing something. Start itunes. Play a tune! Your minimac can be a remote controlled media center. woot.

X Windows

I like free software. Therefore, I want to use Ardour, which is free. My minimac has a large, external disk. Therefore, I want to run it on the mini, but control it with my wimpier laptop. First, you must install X11, which comes on the operating system CD from Apple. Install it on your laptop AND on your macmini. Also, install the developer kit on both (or at least the mini). Then, install Ardour on the macmini.
Ok,you may have noticed that sometimes VNC has a bit of lag. Because Ardour is an Xwindows application, it’s possible to reduce the lag by not using VNC. Instead, you can tell it to run on the macmini and to display on your local machine. However, this requires a smidgen of additional effort.
Apple has a bunch of information on X. It’s a good thing to read if you’re having a problem or just want to understand what’s going on.
First, you need to tell your macmini what you’re up to. Go back to the terminal ssh connection that you made from the laptop to the macmini. (If you closed the connection, reopen it). Then cut and paste the following commands to the terminal window:

sed 's/#X11Forwarding no/X11Forwarding yes/' /etc/sshd_config > /tmp/sshd_config
sudo mv /tmp/sshd_config /etc/.
sudo chown root /etc/sshd_config

You will need to type the password for your account on the macmini. These commands tell the ssh daemon to allow X forwarding. You may need to restart the sshd (or, if you don’t know how to do that, just reboot the whole computer by typing “sudo shutdown -r now” (without the quotes)). It would also probably be a good idea to repair disk permissions at this time.
Now, reconnect to your computer, using the same ssh command above. The -X flag allows X forwarding. That one typed command enables all your secure communications! Open X-windows on your laptop. Type into the terminal connection to the minimac:

/usr/X11R6/bin/xeyes

If all is working, a pair of eyeballs should open on your laptop. If all is not working, you’re going to have to look at some apple documents to figure this out.

Remote Ardour

Ardour, by default,opens windows on the machine that launched it. This means that if you launch it on your macmini, you can control if via VNC right away. But this is not efficient. It’s better to close VNC and just use X for this process. There are a few ways to make this happen. The one I’m describing is not the best, but it does work (hopefully). Note that the following assumes that you put Ardour.app in /Applications. If you put it someplace else, you will have to modify the path below
On your macmini, type:

cd
mkdir bin
cd bin
cat > ardour
#/bin/sh -l

/Applications/Ardour.app/Contents/Resources/bin/exporter

type control-D. Then type:

cd
cat >> .profile

PATH=$PATH:$HOME/bin

export PATH

Type ctrl-d again. What you’ve done is create a tiny executable file that uses the right path to open Ardour and added that path to your shell. You could also do this with an alias.
Logout. (type “exit”). Then log back in (with the long ssh command way above). Open X-windows on your laptop. Type “ardour” (without the quotes) at the terminal prompt. A window should open on your local machine.
Hopefully this all will save somebody else a lot of time.