Successful sealant

I printed a small, self-contained mould in PLA for testing purposes. This section has the proportions that will hopefully be used in the final design, however, it does not need to join to any other sections of tentacle. I coated the pieces in PLA sealant XTC-3D.

I had previously been warned away from this sealant both because it’s fairly toxic and because the person selling it warned it may have an inhibitive effect on the silicon. I used the facilities that the University of Kent makes available for people working in resin to limit my exposure to the toxicity. I also coated the sealed mould in jelly vaseline, both to provide a barrier against any effects of the XTC and to make release easier. This was entirely successful.

Air hood

The sealant did tend to pool and form drops which dried in place. This would reduce the thickness of the cast piece, so I adjusted the moulds to compensate for lost thickness. I also sanded off drops. Some of the sealant also created lumps that prevented the mould from shutting properly, so I chiselled those parts away.

Sealant removing

Another difficulty was that the silicon I bought is too thick to pour into the top of the mould all in one go. It does not reach the bottom. The store suggested that I paint the inside of the mould with silicon, close it, mix up a second batch, and pour more in the top. This did not work.

Test pour

The silicon pooled at the top and failed to fill the mould. This was partly because, the sealant had filled up all the small air channels that I’d left in the moulds, and thus air became trapped, leaving no room for the silicon to fill the mould. I then drilled out the holes, using a drill press due to a shortage of charged batteries.

Drilling Airholes into mould

I tried again using three separate pours and the result was much better, but still inadequate.

Test pour

PlatSil Gel 00 is simply too thick to use in this kind of mould. The bottom of the mould (top of the picture) looks mostly alright, but there are still large airholes where air became trapped. Thinner silicon may solve this problem, or it may be necessary to put a third air channel at the apex of the arches in the mould.

I have lost access to the University of Kent’s workshop due to the School of Music and Fine Arts closing, so I’m hoping that just drilling through the existing moulds will be sufficient.

The flat piece of the design works extremely well with both this silicon and release agent, so the silicon I purchased will work for part of the final application.

Flat part

Due to the aforementioned closing of the workshop and my loss of affiliation with Kent, I rushed to print and coat an entire three-part mould, despite not having time to test if my join design will work.

To reduce the need for chiselling, I tried using masking tape to cover all the parts where the moulds touch each other and seal. This did not work, however, it’s possible I just needed to remove the tape sooner.

Masking tape

The last picture shows a translucent white PLA. My previous batch of grey PLA was rescued from an incinerator by refil. By the time I ran out of it, they’d sold out, so I’ve switched to their normal supply of PLA, made out of recycled vegware – the alledgedly biodegradable cutlery and coffee cup lid plastic. As far as I know, this is not generally recycled in the UK, and it’s always better to use non-disposable items in cafes.

Next Steps

In my previous post, I had confessed to feeling discouraged, but I do think the latest efforts have turned a corner. Although I have lost access to my workshop, silicon is not at all toxic to handle and requires no special precautions, so I should be able to try pouring with more appropriate material at home.

My moulds may require more air channels, but I’m hoping this will not require reprinting them. Printed holes are contained by walls, whereas ones drilled through a print will open directly to the supporting grid of the print. 3d prints are not solid, but have a largely hollow matrix supporting the outside walls. Keeping a drilled hole clear may prove to be problematic, but even if this is the case, getting only a single good cast will prove that the concept is sound.

More tentacle attempts

After a failed print, I decided to rationalise my moulds. These are created via a parametric tentacle design program in OpenSCAD. Obviously, changing the mould requires program changes, but this time my goals were both to ensure that it can create a mould across a wide range of parameters for users who want unusual sizes and to include an optimal ratio of parameters based on actuator research.

My program does not cope with tiny sizes. It’s expected that tentacles designed with it will be nearly as long as the print bed of a Ultimaker or longer. However, it seems likely that optimal ratios will be constant across actuator sizes. I adopted the ratios given by K Ogura et al, developed for tiny actuators. (2009)

As their actuators are squared and mine still have rounded edges, it may be that these are not optimal, however, I do feel that the new, narrow mould has higher aesthetic appeal.

Narrower Tentacle

Silicon

Before trying to cast this, I went to the 4d Model Shop to discuss the difficulties I had with my last silicon cast. The person working around the casting section of the store is extremely knowledgeable and helpful. She suggested that what I needed was a lower viscosity silicone, but as I still have a quite a lot of the high viscosity left, she suggested I paint the mould with a small amount of it, close the mould, mix up a second small batch and pour that in the top. She suggested that may allow the silicon to flow through the entire mould before it sets. Unfortunately, the shop does not sell retarder.

She also told me that although silicon does not adhere to PLA, the porousness of a 3d printed PLA mould creates a lot of surface irregularity that silicon will flow into, making the two part mould extremely difficult to separate. The mould must first be sealed.

Epoxy sealant is toxic and may contain elements that prevent silicon from curing, so she suggested I experiment with a high gloss polyurethane sealant and then paint liquid Vaseline over that as a release agent.

I painted a single coat of sealant on one mould section, followed by the vaseline. I then mixed up a tiny batch of silicon. During this process, the scale turned itself off, so I was forced to estimate ratios of the two part compound. I therefore used two mould sections, one as a control group in case the haphazard ratio has curing problems.

The experimental section had a thicker piece of silicon and was made slippery by the Vaseline, which may be why it was more difficult to remove that the section that had no treatments.

My next steps will be to:

  • try a different sealant
  • try using more coats of the existing sealant
  • try using non-liquid vaseline to better cover over cracks in the mould
  • try using other household materials such as sunflower oil or sudo cream

Bioplastic

I’ve currently got a small batch of corn plastic drying, which is taking more than a week. The volume is decreasing significantly and I’m not sure it will be enough to make a test cast once it dried enough for me to melt it.

I’ve found some very promising research about using food waste to make bioplastic. The experiment was done using a dilute solution of hydrochloric acid – so dilute that vinegar is more acidic. I wish to see if vinegar would also produce this result, but it requires a food dehydrator and the ability to stir a solution at 40C for more than day – so a magnetic stirrer hotplate.

There is also research about citrus peels, specifically. This is perhaps the most interesting avenue. Pectins are stretchy like gelatin, which has been tested in actuators. It’s also easily available in my area. The processing is very much like other food waste processing, so the same equipment is required.

Feelings

This is all taking much much much longer than I thought it would and I have to say, I’m starting to feel extremely discouraged. While the 3d programming has turned out to be a lot easier for me than I anticipated, virtually everything else has been vastly more difficult. I was hoping to have some kind of prototype by autumn, but this looks less and less likely. My workshop access has been through my primary employer, the University of Kent. However, the department I teach in is closing and thus I’m becoming redundant over the summer. It’s still unclear whether the arts workshop is also closing at this time.

Cooking bioplastics in the kitchen is extremely unpopular with my spouse and I don’t really have space for a food dehydrator. I hope the London Hackspace may be able to help with this, however, they’ve moved rather a long way from the old neighbourhood.

Works cited

Bátori, V et al (2017). Production of Pectin-Cellulose Biofilms: A New Approach for Citrus Waste Recycling. International Journal of Polymer Science [Online] , vol. 2017, Article ID 9732329, 9 pages, 2017. Available at: https://www.hindawi.com/journals/ijps/2017/9732329/cta/ DOI: 10.1155/2017/9732329 [Accessed May 2019]

Keiko Ogura et al (2009). Micro pneumatic curling actuator – Nematode actuator. 2008 IEEE International Conference on Robotics and Biomimetics. [Online] Available at: https://ieeexplore.ieee.org/abstract/document/4913047 DOI: 10.1109/ROBIO.2009.4913047 [Accessed May 2019]

Perotto, G et al (2018). Bioplastics from vegetable waste via an eco-friendly water-based process. Green Chemistry, [online] 20, pp. 894-902. Available at: https://pubs.rsc.org/en/content/articlelanding/2018/gc/c7gc03368k/unauth#!divAbstract DOI: 10.1039/C7GC03368K [Accessed May 2019]

Edible Octopod?

Mould Revisions following a Pour Attempt

As reported in my previous post, I created some moulds out of PLA for silicon casting. The second version of the mould fit together well. It had a single pour hole in the larger outside block.

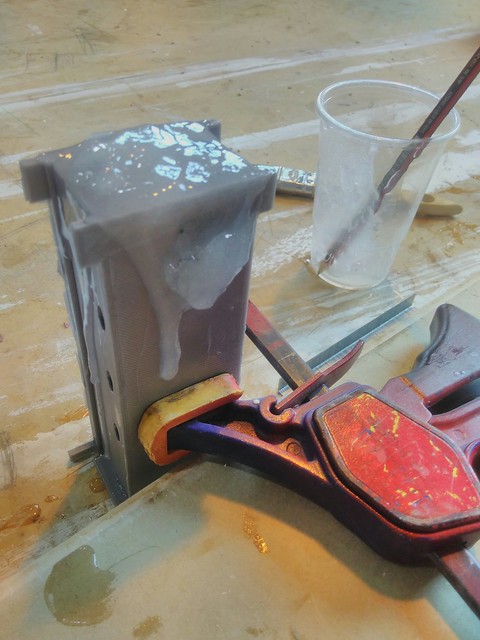
When pouring silicon into this hole, there was no route for air to escape the mould and the silicon was slow moving within the mould. The silicon began to harden before even a fraction of the pour was complete.

Despite the small amount of silicon that got into the mould, it was extremely difficult to open, showing that the use of a release agent is necessary. Also, the slowness of the pour shows that a retarder is required.

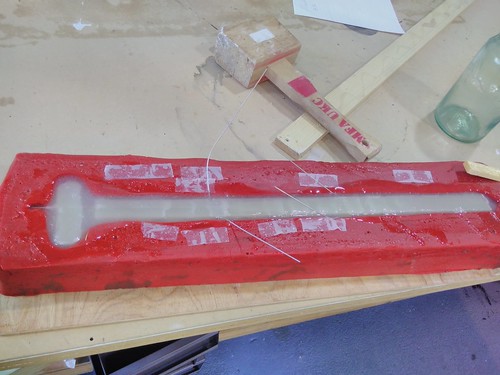
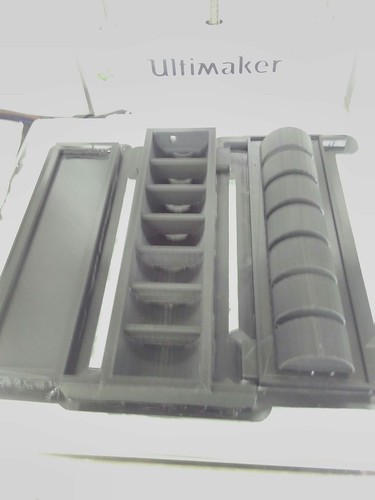
I’ve made two versions of an updated mould. The larger mould piece has additional channels for which silicon to flow in and small air channels for air to flow out. There are now two identical pour holes and two smaller air holes. The airholes are connected to a narrow channel running for the length of the mould, which connects to the topmost part of the internal cavities. This should allow air to escape and if some silicon gets into the channels, it should not cause a problem.

Dual pour hole, small air vents

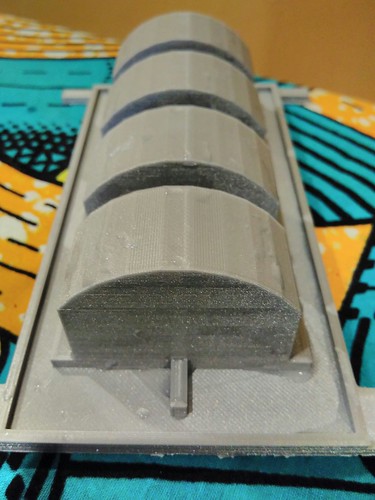
The other half of the mould has two new designs. The aesthetically superior one cuts out a round channel for silicon flow. This channel is the same diameter as the cut-outs of the other part of the mould, which should give it a unified look. However, this creates an overhang. As the tentacle will be cast in a soft material, it should hopefully be possible to peel the tentacle from the mould without doing it damage.

Because the overhang may fail, I’ve also created a version of that half of the mould that has narrower protrusions. This should also allow better pouring channels for silicon, but will cause the walls of the finished tentacle to be much thicker on the outside edge.

Notches for better flow

Bioplastic

In the mean time, I’ve been experimenting with bioplastic and food waste. PLA is sort of biodegradable and recyclable, but silicon is not.

Banana Peel Plastic

My first attempt at bioplastic was overly ambitious. Banana peels contain starch, so I used those. I used a lime peel as an acidic element to get free ions. I added coffee grounds as well. For preservative, I added a mixture of sage and tea tree essential oils. And used glycerol as the plasticiser.

Ingredients

  • 1 lime (post juicing for another recipie)
  • 3 banana peels
  • 1 moka pot’s worth of spent coffee grounds
  • 0.5 tsp tea tree oil
  • 1 tsp sage oil
  • 0.5 tsp vinegar
  • 2 tsp glycerol

Procedure

  • boil the limes and insufficient amount amount of time. save the water.
  • boil the banana peels 30 minutes
  • dry the banana peels 30 minues
  • blend the fruit and coffee with enough lime water to make a paste.
  • cook until thickens
  • Apply to final shape
  • Bake at a low oven temperature to dry

Results

The shape I attempted to make was a flower pot, moulded over an empty jar. While the material did mostly bond together, it took more than a week to fully dry and has had some cracking.

Some of this may be due to how ripe the peels were- presumably this caused some of the starches to convert to sugars. Also, I failed to remove any parts of any peels, so fibres and stems got into the final product. While these were unintentional, they have probably aided the stability of the structure.

Bioplastic Plant Pot

Corn Flour Plastic

My second attempt used corn flour (also known as corn starch), vinegar, salt, glycerol and coffee grounds.

For this, I used slightly more corn flour than I’d use for gravy, as much liquid as I would use for custard, a teaspoon of glycerol, a teaspoon of vinegar and a few pinches of rock salt.

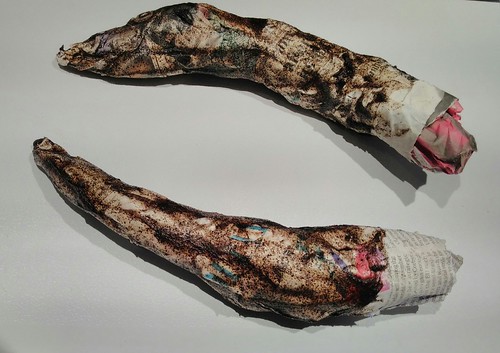
I cooked all of the ingredients together until they started to thicken like custard. I then transferred the mixture to a takeway container and added a teaspoons of sage essential oil as a preservative. I applied the mixture to paper maché animal horns, and put it in the oven at a low heat.

These took a day to dry, but the plastic has come out successfully. While I don’t have any good measurements for ingredient ratios, it seems I used a large amount of glycerol relative to the corn starch. This created a very flexible rubbery plastic, not altogether unlike silicon in consistency.

Paper mâché Horns

Bioplastic Actuators

Previous research into bioplastic soft robotics is available. The paper, Soft Pneumatic Gelatin Actuator for Edible Robotics [DOI: 10.1109/IROS.2017.8206525], especially caught my fancy. While a theatrical robot falls outside of their potential applications (which charmingly suggests “food transportation where the robot does not require additional payload because the robot is the food.” (Shintake, et al., 2017, p 6221)), an edible robot is a biodegradable robot.

Using food for non food applications also has ethical issues, however. Part of my goal with bioplastics is to utilise food waste and as such, I will be investigating the possibility of highly flexible banana peel actuators. Although the starch in these peels is edible, it’s usually discarded. Using this for plastic thus reduces food waste and potentially may help highlight the culturally-based waste of edible items.

Finally, I can make this kind of plastic in my kitchen and don’t need to access a workshop.

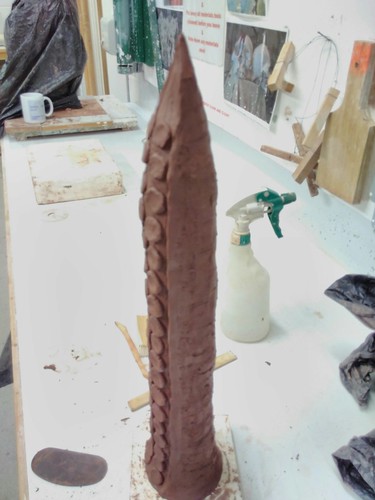
First Tentacle Attempt

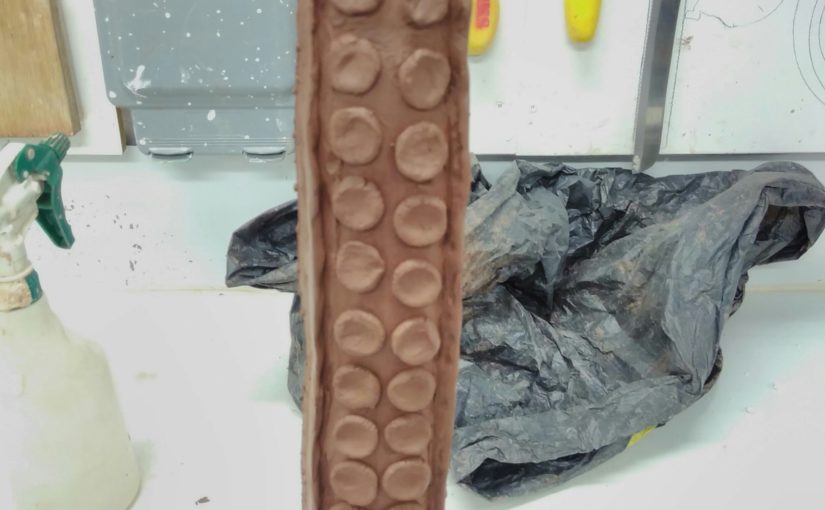
My first bioplastic tentacle section used an unmeasured corn flour plastic similar to the plastic above. It contained no vinegar but instead copious amounts of sea salt, as this also frees up ions and may help preserve the plastic. For additional acidity, I scavenged a lime that had not been juiced to the fullest possible extent and squeezed the remainder into the plastic. The preservative was 1 tsp tea tree oil. As I did not strain the lime, some pulp got in, probably rendering moot the various preservative attempts.

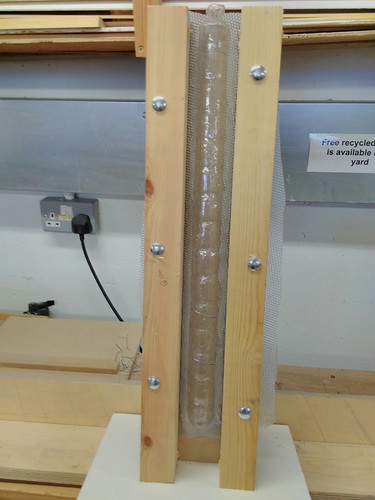
I brushed the inside of the mould with sunflower oil. Corn flour bioplastic starts to set even more quickly than silicon and there are really only a few seconds to decant it into the mould. As such, I did not use the pours holes, but instead spooned the plastic into the mould and struck the lid with my hand to force it down. Excess plastic leaked from the top and pour holes.

The drying process for starch bioplastic seems to rely on access to air, so it was still completely uncured after several days and was damaged by opening the mould to check on it.

Uncured bioplastic

Shintake et al, mentioned above, used gelatin-based bioplastic, which may be better suited to this application. This is also often a food-waste product, however, it’s made via an industrial process using waste from the meat industry (Etxabide, et al., 2017) and is not something I could really make at home. I’ll be looking at whether I can extract pectin from fruit peels and use it for plastic.

Unresolved Issues

As all the tentacles need to be identical, proper measurements and consistency will become extremely important.

My moulds are designed to create the tentacle in two parts which must be joined together with an airtight seal. While this seems straightforward in silicon, I don’t yet know how difficult it will be with bioplastic. Perhaps a hybrid silicon/bioplastic tentacle is the answer, as I do not actually want my robot to be eaten.

The durability of this material is also unknown. One design studio on YouTube says that essential oils act as preservatives, but it’s unclear how long this prevents decay.

References

Bilgin, E. (2013). Banana peel plastic – Science DIY. [online] Sites.google.com. Available at: https://sites.google.com/site/scidiy/diy-plastic/banana-peel-plastic [Accessed 7 May 2019].

Borroni, L. (2018). DIY bioplastics from orange peels and ground coffee – YouTube. [online] Youtube.com. Available at: https://www.youtube.com/embed/PrUjjzznwEE [Accessed 7 May 2019].

Etxabide, A., Uranga, J., Guerrero, P. and de la Caba, K. (2017). Development of active gelatin films by means of valorisation of food processing waste: A review. Food Hydrocolloids, [online] 68, pp.192-198. Available at: https://www.sciencedirect.com/science/article/pii/S0268005X16303605 [Accessed 7 May 2019].

Shintake, J., Sonar, H., Piskarev, E., Paik, J. and Floreano, D. (2017). Soft pneumatic gelatin actuator for edible robotics. 2017 IEEE/RSJ International Conference on Intelligent Robots and Systems (IROS).

wikiHow Staff Editor (2019). How to Make Bioplastic. [online] wikiHow. Available at: https://www.wikihow.com/Make-Bioplastic [Accessed 7 May 2019].

Octopod

I’ve been working for several months on a soft robotics project, on which I’m making very slow progress. The goal is to create a soft robotic octopod (or hexapod) – basically an octopus with inflatable tentacles that can walk around.

I’ve been working on the tentacle design thus far. They’re to be trefoil tentacles. Here’s a video of the tentacles which gave me the idea:

My tentacles are hopefully going to be much longer and won’t look like that, probably. I’ve gone though several design revisions. Most of the early versions were hand-built in clay.

Life-like

Still-life Tentacles

I started by making something that looked like an actual tentacle. The idea was that I would make a cast of it in vinamold. I made clay models of spines, also cast in vinamold, that I was going to use to make wax spines. The spines would be dangled down inside the mould of the outer tentacle and silicon poured around them. Then, they’d be melted back out. The voids they left behind could be pressurised with air to make the tentacle move.

First Tentacle Design

The problems with this design became quickly apparent, but the most major was the asymmetry of the exterior shape was going to make it difficult to calculate the angle of the tentacle. If all sides are equal, the pressure of the interior spaces correlates directly with the angle, but having varying thicknesses around the outside makes that much harder to compute.

Tentacle air pockets

Symmetric in Vinamold

The next version uses a single model for all three sides of the tentacle. The curved part faces the outside, and the flat parts are joined in the middle to make a triangular tube down the centre of the tentacle.

I made the spine out of wood (not pictured) and then sculpted around it with clay to create the outer skin layer. I cast both parts in vinamold.

(Failed) Clay Tentacle

The previous version had a vertical mould, but this one was horizontal. I suspended the wax spines in the mould by casting them around a thick wire, which I embedded into the mould for the outer skin.

Floating wax

However, the wax floated in the silicon and the horizontal pour caused lamination (peel-y, layers of silicon rather than a uniform solid). When I melted the wax out, the tentacle was not air tight. It was much thicker on the rounded side than the flat side.

Failed Tentacle

Vacuum Moulded

I realised I could repair the troubled tentacle by casting just a flat side for the inside layer and gluing it and the outside layer together. The best way to do this would be to do the outside layer and the inside layers separately. I also wanted the layers to be thinner overall.

Once again, I made a model in clay, but this time was very careful to keep only a tin layer around the spine. I made a vacuum mould of the spine and then added a thin skin to that spine and took a second vacuum mould. With some help from the workshop staff, I built a holder for the pair of them, with a little funnel in the top.

Vacuum Plastic Mould

I could make a vertical pour of the silicon, which would be much more likely to hold. However, the plastics didn’t align perfectly around the edges and when I did a test pour with a cornstarch solution roughly as thick as the liquid silicon, it leaked out.

3d Printed prototype

Almost every write up of soft robotics I’ve found uses 3d printing rather than hand sculpting. I decided to switch to this more conventional approach. Using OpenScad, I wrote a little program to create a parametric mould for a tentacle.

I have terrible luck with the 3d printer owned by Kent’s School of Music and Fine Arts and the first print glitched.

Failed Print

This was intended to be a short, self-contained third of a tentacle. The flat part on the left is the inside edge. The middle box is shows the outer edge. The part on the right provides the hollow sections for the void.

In addition to the print glitching, Cura silently resized it to fit into the printer, which would have made the walls too narrow. To prevent future glitches and to keep things at the correct size, I’m now printing every component separately.

Printing at Home

Almost all of the work up to this point was done in the worskshop of Kent’s School of Music and Fine Arts. I received extensive help and support from George Morris and Georgia Wright.

As the workshop was closing for Easter and I had bad luck with prints, a few people suggested I get my own printer. I got an Ultimaker 3, but was too impatient to do a self-contained, short full tentacle again.

To make a longer tentacle, it would need to be broken into sections. The first section is the length closest to the robot’s body. One end had no input or output of air. The other end has an output. The middle section has an input at one end and an output at the other. (This section can be repeated to create a much longer tentacle.) The end section has an input but no output.

I started with the first section. The end closest to the robot is at the top of this photo and then end that joins up with the subsequent section is at the bottom.

Tentacle mould

My first print did not fit together correctly, so I’ve changed the program and am trying again. The most recent version is the one pictured.

This is taking longer than I anticipated. However, over the course of things, I’ve learned to sculpt, to make rubber moulds, and to do vacuum moulding as well as other workshop-related skills.

I’m hoping to get an inflatable tentacle within the next few weeks.